- Home
- Quilting Tools/Supplies
- Quick Quarter Ruler
Using a Quick Quarter Ruler...
...makes marking patchwork units quick as a whistle!
This post contains affiliate links for which I receive compensation.
The Quick Quarter Ruler is the well-named quilting tool used by quilters to quickly and accurately mark quarter inch stitching lines for half- and quarter-square triangle units, along with Flying Geese.
The tool can be used for either the Quick Pieced or 8 at a Time methods for making half squares triangles (HST).
Since quarter square triangles are nothing but 2 pair of HSTs, you can use it to mark Quick Pieced Quarter Square Triangles, too.
 8" Quick Quarter Ruler
Last but not least—use it, too, for our Four at a Time, No-Waste Flying Geese units.
(Click on any of the preceding underlined techniques for more information on that particular method.)
Pros and Cons
 Open toe
applique foot
The Quick Quarter works exactly as advertised.
It's benefits are:
- You position it only once to mark both sewing lines on each pair of squares
- You sew on the drawn line instead of 1/4" away from it
Here is a comparison of the two marking techniques:

To mark both lines with a standard quilt ruler, you
re-position it for EACH line or twice per square. For marking, say, 100 squares, that adds up to a big time savings. YOUR time.
On the other hand, this is another ruler to store whose job can be replicated with your regular rotary ruler.
You may find it easier to stitch on the drawn line with an open toe applique foot because there's nothing obstructing your view of the marking.
This foot may or may not already be in your accessory case. Click here to see possible options for your sewing machine if you don't already have one.
How to Use the Quick Quarter Ruler
On the back side of a square patch, line up the center notches in this ruler with a pair of diagonal corners.

Mark along each side of the ruler. I prefer to use a mechanical pencil because the line is always the same size.
In this example a lead pencil is used. If this were a darker fabric I'd have chosen my favorite Bohin mechanical chalk pencil (in white) for an easier-to-see light colored mark.
(Sewline also offers this type of marker, though I personally haven't used one.)
Hold the pencil at an angle so that the lead is right next to the ruler.
Sometimes the pencil wants to grab and pull on the fabric. If it happens to you, try marking each line from the center out to minimize or eliminate this problem.
You may choose to mark in the notches, too. This notched line represents the cutting line.
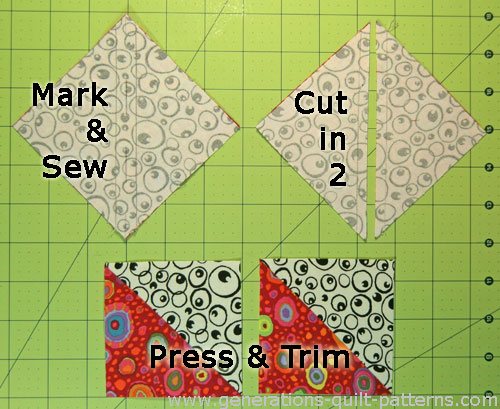
After marking, your patch looks like this.
 The arrows point to the solid stitching lines.
Now layer your patches right sides together and stitch on the drawn lines using your normal machine set-up for piecing.
 An open toe applique foot in action...nothing to block your view of the markings
If you are sewing many half square triangles, make your work easier by alternating between the two different line positions.
In the photo below, the left line (as you sit at your machine) was stitched and I am just getting ready to stitch on the right line of the next pair of patches. (The arrows point to the right-hand line on each.)

Notice how nicely the patches snug up to each other—much less chance of your sewing machine 'eating' the edge as you stitch.
Press the patch flat to set the seams, then cut the square in two between the two stitching lines—or on the dashed line if you drew it.
Finally, press the patch open with the seam allowances to the dark
(traditional), or light (possibly to reduce bulk) or open (to reduce
bulk). The choice depends on your preferences and
needs.
Trim to size if necessary.
Purchase a Quick Quarter Ruler
In the photos above, my trusty Quick Quarter is yellow (I've been quilting almost since dinosaurs walked the Earth). These days they are made out of a blue plastic.
They come in two sizes—8" and 12" inch. Mine is eight inches long and I've never had need of a longer one.
Helpful Hint
The eight inch ruler works for squares up to 5-1/2".
The twelve inch spans the diagonal of squares cut up to 8-1/2" x 8-1/2".
Click either image below to go directly to Amazon.com to read reviews and/or purchase a Quick Quarter Ruler that fits your piecing needs.


Can't decide which size would be best for you?
Got'cha covered! :D
Fons and Porter offers two different 2-packs. The first includes two of the standard size.
The extra-long 14"/18" combo shown below works well for quick piecing with layer cake precuts (whose diagonal measurement is a hair over 14").
Omnigrid offers a 3-pack for even more versatility.


And finally, Studio 180 (maker of the rulers I love so much) makes a colorful version called the "Quilter's Magic Wand" that's a 1/2"wide by 12".
Made out of clear, colorful plexiglass in blue, green, light pink, orange or yellow, it has an etched line down the middle to help you position it.
Which will you choose?


By Julie Baird
Copyright © 2008-2024 Generation Quilt Patterns, LLC
All Rights Reserved
Generations-quilt-patterns.com does not sell any personal information. (See Privacy Policy)