- Home
- Machine Quilting 101
- How to Machine Quilt
How to Machine Quilt Your First Quilt
Beginning Machine Quilting 101 continues...
This post contains affiliate links, for which I receive compensation.
This 'How to Machine Quilt' section uses the rail fence quilt block pattern as an example.
Click here to see more design options for this traditional patchwork pattern.
This type of quilt is characteristic of your beginning quilts. Simple construction. Not a lot of seams to match. And hopefully not too big.
The perfect project to practice both your basic piecing and machine quilting skills.
For your first quilts you'll learn the basic techniques of quilting with your walking foot, and sometimes, simple free motion quilting with your darning or hopping foot.
This section deals solely with quilting with your walking foot.
At this point in learning how to machine quilt:
- Your quilt sandwich is pin basted with enough safety pins
- Your sewing machine is set up for stitch in the ditch
- Walking foot is attached or Pfaff IDT engaged
- Feed dogs are up; stitch length of 2.0 to 3.0
- Machine is threaded
- Sewing machine tension is adjusted
You're ready to learn how to machine quilt your quilt!

Stabilize and Anchor
The first lines of quilting are to prevent the quilt sandwich from shifting.
To do this, ditch quilt in the seam lines of the major elements of the quilt top, i.e. seam lines between blocks or along borders or sashing. (You are not quilting within a block at this time.)
If you've used a variety of fabrics in different colors and values (lights, mediums and darks), try using monofilament thread. Anchoring stitches are not meant to show. And stitching in the ditch with monofilament thread is less apt to show.
How to Machine Quilt a Straight Set
This type of quilt is arranged with the blocks in horizontal rows, with or without sashing and borders. (Each block is made with four strips of fabric sewn long edge to long edge.)
The first two lines of this anchor quilting are along the center most seam, both vertically and horizontally. (below)

Make it a habit, as you learn how to machine quilt, to stitch the seam line that lies on the lengthwise grain (the most stable grain) of the backing fabric first.
Then turn your quilt 90 degrees.
Quilt the crosswise center most seam. These stitching lines form a "+" on the quilt top.
If there is no seam in the very center, stitch the next one closest to the center instead.
Note that each line is stitched from one side to the other.
DO NOT machine quilt these lines out from the center as that would distort your quilt.
How to Machine Quilt a Diagonal Set
This type of quilt is arranged with the blocks set in diagonal rows, with or without sashing and/or borders. Corner and setting triangles (pieced or cut from solid fabric) are used to turn the patchwork into a complete square or rectangle.
The first lines of quilting are along the bias grain of the backing fabric.
Bias can stretch as you stitch. To compensate and control the layers, use plenty of safety pins to baste. To save time, avoid pinning on the seams where you'll machine quilt first.

For a square quilt, the first two lines of stitching are along the center most diagonal lines running from corner to corner (stopping at the border if there is any).
These lines of stitching form an "X" across your quilt top. (above, right)

For a rectangular, diagonally set quilt, begin at one corner and stitch in the ditch in the center-most, diagonal seam to the opposite side.
Move to the next corner and stitch in the diagonal, center-most seam for the line that crosses the first.
Turn the quilt 180 degrees and repeat for the remaining two corners. (left)
In our example, the first pair of stitching lines is shown in red. The second is orange.
After this ditch quilting, you can anchor the seam lines between the borders and center of the quilt.
Secure Those Thread Tails
For some quilts the stitching starts within the borders of the quilt. Hand knot or microstitch to begin and end these lines of quilting to secure the thread tails.
Lines of quilting that begin at the very edge of the quilt, like the square diagonal set with no borders above, should start and stop several stitches past the outside edges of the quilt top.
These stitches are secured when the binding is sewn to the quilt.
Inspect Your Work...
...after these first stabilizing stitches are complete.
How does your machine quilting look?
Are there any tucks where the stitching crosses?
Tucks on the back are a sign the quilt wasn't pin basted properly.
Either not enough pins were used or the backing was not taut enough during the basting. Tucks, here, indicate you'll probably have tucks throughout the quilting.
If this will bother you, this is the time to rip out your stitching and re-baste your quilt top before there are too many problems.
Finish the Ditch Quilting
In the following illustrations, quilting lines shown in black were stitched in previous steps.
Once the anchor quilting is complete, return to the the first line of quilting.
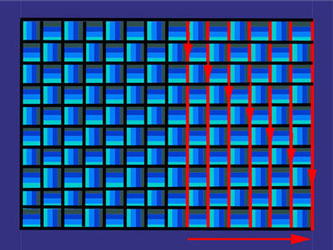
Ditch quilt the first seam to the right side of the center stitched line. Stitch from the top to the bottom inside the borders.

Continue in this manner until there are no more lines to quilt. Quilt all of these seams in the same direction. Tie off both ends of the quilting lines when they begin within the body of the quilt. (see right)
By starting in the center and then moving to the outside right, you'll never have more than half the quilt under the arm of your machine at one time.
A true back-saver!!!
Rotate your quilt 180 degrees.
Find the first unstitched seam line to the right of center.
Stitch in the ditch from top to bottom. Repeat until all seam lines are stitched.

Again, by working to the right, at most half of your quilt is under the needle at any one time.
Next turn the quilt 90 degrees, and ditch quilt the seam lines, working out from the center. (below)

It's starting to look and feel like a quilt now, isn't it!
Finally, turn the quilt 180 degrees and ditch quilt the remaining vertical seam lines. (below)
This looks suspiciously like the photo above, but if you look closely at the lefthand side you can see those vertical lines were just quilted.
It's helpful to learn how to machine quilt this way so only half the quilt is ever under the arm of your sewing machine.
It's easier to quilt with less bulk under the arm because it leaves more room for your hands.
You have more control.
For diagonal sets like Figures 2 & 3, follow this same pattern of quilting. Start from the closest diagonal line to the center and work out to the right, rotating and stitching as each group of structural lines is stitched.
How to Machine Quilt the Border
If you've followed the instructions, the seams between the borders and center are already stitched.
Can you stitch in one continuous line around the whole border? The answer is..."Yes, BUT..."
You risk pulling the quilt out of square or stretching the batting.
But it is YOUR quilt. How you choose to machine quilt it is YOUR choice.
If you quilt the border in a continuous line, take care at the corners.
Stop with your needle down in the very corner. Re-adjust the quilt. Make sure everything lays neat and flat to avoid tucks. Then continue quilting.
Some quilters add a line of stitching within a 1/4" of the quilt's edge so they can remove the safety pins at the edge early on. Be sure your binding will cover this stitching later on.
The Quilting is Finished...?
Just like our rail fence quilt pattern, for many beginning quilts, once this anchor quilting is done, the quilt IS quilted.
If you've used a lot of "busy" prints in your quilt top, most decorative quilting won't even show. Only ditch quilting is needed.
Moving On
As your piecing becomes more involved, so too, does your quilting plan.

Complete any additional quilting in the following order:
- Any stitching with a walking foot.
- Free motion design quilting. These are the pretty designs you add to a quilt. Feathers and stenciled designs. The "WOW" quilting.
- Free motion background fills like stippling or pebbles. This type of quilting is always done last. It has a tendency to "draw up" or shrink your quilt top.
Regardless of how much quilting your finished quilt has, once you've learned how to machine quilt to stabilize and anchor the main structural lines, you have the freedom to move from block to block.

My must-have machine quilting aids
Click any image for more info, reviews and ordering instructions.


Table of Contents
for Beginning Machine Quilting 101
Introduction
Beginning Quilting 101: Quilting Instructions for the Beginner
Preparing to Quilt
The Quilt Sandwich
And finally, the Quilting!


The best book for the beginning machine quilter
If you can only have one in your library...this is it!

By Julie Baird
Copyright © 2008-2026 Generation Quilt Patterns, LLC
All Rights Reserved
Generations-quilt-patterns.com does not sell any personal information. (See Privacy Policy)