- Home
- Quilt Binding
- Quilt Binding Instructions
Continuous Bias Quilt Binding Instructions
Part 2: Make the Continuous Binding Strip
This post contains affiliate links, for which I receive compensation.
Our quilt binding instructions continue with marking and cutting your rectangle.
Determine Strip Width and Length
In Part 1 of our instructions we calculated the total length of continuous bias binding and the strip width for a quilt.
Then we used the Bias Binding Yields chart to determine the size rectangle needed.
Cut and Mark Your Rectangle
The rectangles in our two binding charts are for a 40" of usable width or fat quarters.
For clearer illustrations, we've used a rectangle that is a 22" by 13-1/2". That way you can see the whole piece as it lays on the cutting mat.
Let's begin!
Step 1
Cut a rectangle of binding fabric the size determined from the Bias Binding Charts.
Remove the selvedges. The two pairs of opposite sides of your rectangle should be parallel.
Lay the rectangle on the cutting mat, backside facing up. All marking will be made on the back or wrong side.
Line
up the 45 degree line of your ruler with the non-selvedge edge and the
corner as shown. Cut along this line.
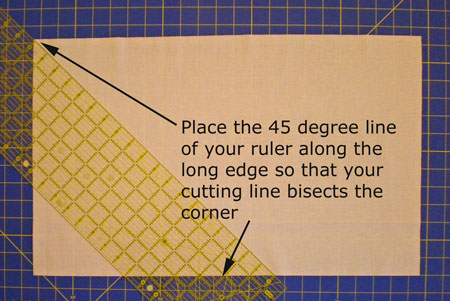
Photo 1
Move the triangle you created to the opposite side. After cutting and moving, it looks like this...

Photo 2
Notice that we've marked an "X" on the edges where the selvedges used to be. This helps to keep things oriented properly. The two long edges are straight of grain. The two short, diagonal edges are true bias.
Step 2
Match the edges marked with the "X's" together. Pin and sew a standard quarter inch seam.
Press flat to set the seam and then open and press again. All the seams in this method are pressed open to reduce bulk.
Step 3
For the next steps in our quilt binding instructions, we've used a black Sharpie to make it easier to see the markings.
For your continuous binding strip, use a less noticeable marker like a Bohin Mechanical Chalk pencil or graphite pencil. The mark needs to last through the marking, pinning and sewing that follows. Mark just dark enough that you can see it.
Use a ruler to mark the quarter inch seam line on the two long straight grain edges.

Photo 3
Step 4
Starting from one bias edge, mark parallel lines a strip's
width apart across the width of your binding material. Make sure that the
intersection of these lines with the marked seam allowance are quite
visible.
In our example, these lines are 2-1/2" apart.
On one long straight grain edge, mark the intersections of the
cutting and sewing lines starting with "1". On the opposite side, mark
the intersections but start with "0".
This helps us keep track of the offset we need to make this method work properly.
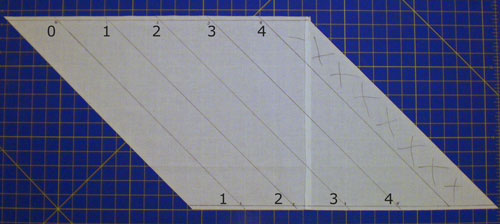
Photo 4
Step 5
With right sides together (the side without Sharpie markings) pin
match the chalk line intersections matching "1" to "1", "2" to "2", etc.
Once all the intersections are pinned, you'll have a 'wonky' tube. (Shown below) If it lays flat then something is wrong. You may need to ease a bit between pinned intersections, but if you measured parallel lines, the easing should be minimal.
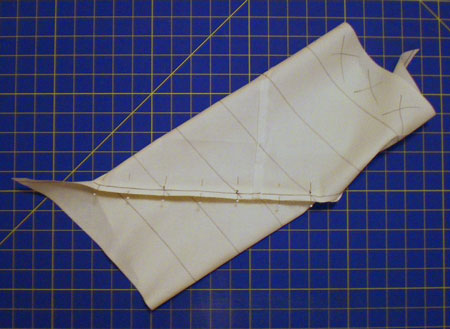
Photo 5
Step 6
Because we'll be cutting through these next stitches, shorten your stitch length a bit to 1.5 (15 to 18 stitches per inch). Sew on the marked quarter inch seam line. Press it closed first to set the seam and then press it. This is how it looks...
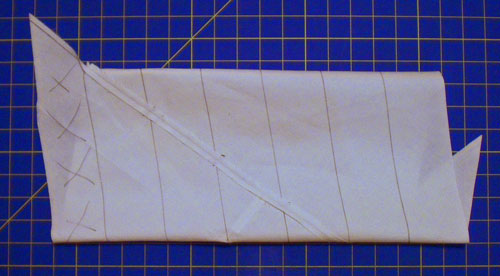
Photo 6
And now for the final steps in our quilt binding instructions...
Step 7
With your scissors, cut along the marked lines you drew. If you've pinned correctly, you will create one long continuous strip of binding. If the tube is wide enough, you may be able to put a small cutting mat inside the tube and use a ruler and rotary cutter.
In our example, we will discard the portion of the binding strip we marked with "X's" (remember it wasn't wide enough).
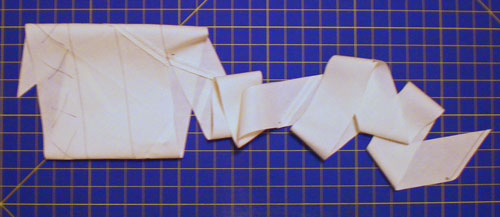
Photo 7
Let's Finish It Up!
To get our quilt binding ready to attach to our quilt, meet the lengthwise cut edges and press. Roll the binding and store until you are ready to attach it to your quilt.


By Julie Baird
Copyright © 2008-2026 Generation Quilt Patterns, LLC
All Rights Reserved
Generations-quilt-patterns.com does not sell any personal information. (See Privacy Policy)