- Home
- Beginner Quilt Blocks
- Square in a Square Quilt Block
Square in a Square Quilt Block
From our Free Quilt Block Patterns Library
This post contains affiliate links for which I receive compensation.
Skill Level: Beginner
The Square in a Square quilt block—sometimes you'll hear it called a 'diamond in a square'— is a versatile little unit.
You see it in so many quilt blocks, like the Storm at Sea, a Mrs. Brown's Choice or in the center of a variable star.
And it's makes a terrific little baby quilt when alternated with nine patch quilt blocks.

The problem is, that for such a cute, simple, little thing, it's a bugger to piece with traditional rotary cutting techniques because the math gets wonky.
But we'll save THAT discussion for later...if you're interested.
For now, let's learn how to piece this little patchwork gem.
The Two Go-To Methods
These tried and true techniques get the job done without the mental, math gymnastics!
The first is 'connector corners' (which you may have already used for a Snowball quilt block). The second is paper piecing (my personal favorite) with several sizes of the Square in a Square quilt block available as a free downloads.
Connector Corners Technique
First up is a method for a Square in a Square block that uses the 'connector corners' technique.
No special tools or rulers needed—just a standard rotary cutter, ruler, mat and marking tool.
And best of all, there's no funky math.
Step 1: Calculate and cut the fabric patches
Choose the finished size for your Square in a Square quilt block or unit.
- Cut the center square fabric equal to the finished block size plus 1/2" (for seam allowances).
- Cut four corner patch fabrics equal to the finished size of the block divided by 2 and add 1/2" for seam allowances.
For example, if the finished size of your block/unit is 4 inches, then cut:
- Cut one center fabric patch 4-1/2" square (4" + 1/2" equals 4-1/2"), and...
- Cut four corner fabric patches 2-1/2" (4" divided by 2 equals 2", then add 1/2")

Step 2: Assemble the blocks
On the back side of each 2-1/2" blue stripe square, draw a diagonal line from corner to corner. Chalk or a light touch on a graphite pencil both work well. You need a line just dark enough to see.
Notice that if the stripes are to end up going the same direction that two are marked with the stripe running up and down; two are marked running left to right.

Layer a 2-1/2" square in two opposite corners of the 4-1/2" square. The ends of the diagonal lines touch the outside edge of the larger patch (at the red arrows). Pin if needed. Sew on each line.

Press the unit flat to set the seam.

Now press the blue squares towards the corners. (Be careful not to press a tuck into the seam allowance.)

Examine your block.
The blue corners should meet the edges of the 4-1/2" square. If they extend past the edge of the 4-1/2" square, trim where necessary.
If the corner patches meet the edges perfectly you can either trim the excess middle blue layer AND the taupe layer to a quarter inch seam allowance or just trim the middle blue layer.
There are two schools of thought on this. Many quilters trim away the excess from the smaller square. I do this because the original 4-1/2" square was cut the exact size needed. Sometimes my sewing on the diagonal isn't as 'exact' as it should be. Leaving the larger square intact means that the sewn unit will be correct regardless of my sewing skills.
If you choose this method your seam allowances can only be pressed away from the center square.
Other quilters choose to remove both the excess taupe AND blue fabric to reduce bulk, especially if the quilt will be hand quilted.
An added benefit of removing both layers is YOU control the direction the seam allowances are pressed.

Layer the remaining squares in the open corners.

Stitch on the drawn lines.
Press the units flat to set the seam.
Press the square towards the corner.
Again, check how well the edges of the blue and taupe squares align. Trim as needed or desired.
Trim seam allowances as needed or desired.
Give it a final press and...

...and your Square in a Square quilt block is finished. Beautiful!
Paperpiecing Technique
This is a terrific little unit to practice your paper piecing skills. Since there are so few pieces, you can get by with using paper from your home printer if you need to. Nothing special to buy!
Step 1: Download the block pattern
You'll need Adobe Reader (the latest version is recommended) installed on your computer in order to open and print any of these square in a square quilt block patterns. You can get Adobe Reader here (a new window will open so you can download it without leaving this page).
If you want to open the file in your browser window, just click on the link. However, if you want to download the file to view later, then right-click on the link and choose "Save Target As" or "Save File As." Then select where you want to save the file on your hard drive.
Once you have saved the file, locate where you saved it, and double click to open.
In order to print, open the downloaded file, and select the "Print" option.
Choose from these Square in a Square quilt block sizes:
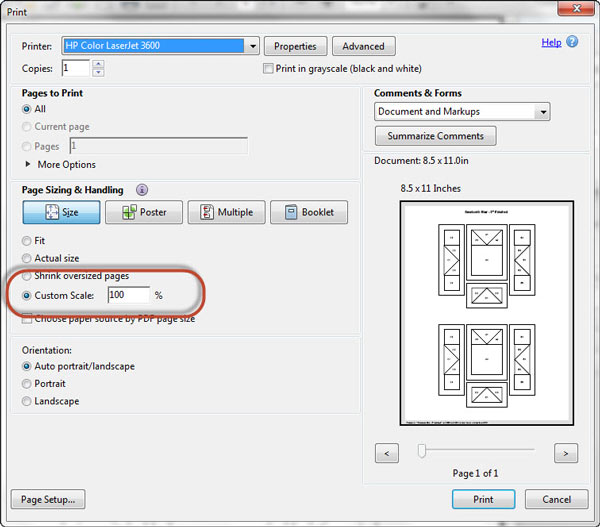
To print blocks at the correct size, under 'Page Sizing and Handling' in the Adobe print menu, set 'Custom Scale' to 100%. Click here to see what it looks like on an Adobe Print Menu page.
Step 2: Cutting Square in a Square patches

Cut your printed pattern into individual blocks--there's no need to make it pretty--a rough cut will do.
The patterns are marked with either 'Center' or 'Corner', followed by a number. The word refers to the fabric choice; the number refers to the order of piecing.
To prevent stretchy edges, you want the outside edges on the straight of grain for stability.
The easiest way to do this is to precut your fabric into patches. The fabric requirements below are for constructing a single block.
| Fabric | Qty | Finished Block Size | ||
|---|---|---|---|---|
| 2" | 3" | 4" | ||
| Center | 1 | 1-7/8" | 2-5/8" | 3-3/8" |
| Corner | 2 | 2-3/8" | 2-7/8" | 3-3/8" |

Once all your squares are cut, cut the two corner squares in half diagonally as shown above.
A striped fabric is used for the corners. To get those stripes all aligned in the same direction in the finished block, one patch is cut diagonally with the stripe running up and down; the other is cut with the stripe running from side to side.
General Sewing Machine Setup for Paperpiecing
- Reduce your stitch length to 16–20 stitches per inch (1.3-1.6 mm). This perforates the paper and stabilizes the seam when you remove the pattern. [Learn more about stitch length here.]
- Reduce your machine's speed or just plain slow down. Sew only as fast as you can stay on the stitching lines.
- Install an open toe appliqué foot (sometimes called an 'embroidery' or 'satin stitch' foot) if you have one (it's easier to see where you're stitching with one installed).
- Use a larger needle (90/14) if you have problems removing the pattern.
- If your machine has a needle stop up, use it. The stitching goes faster when you don't have to lift the presser foot with every seam.
- As you stitch each seam, start and stop a generous 1/4” before and after the solid stitching lines. ALWAYS. Future lines of stitching secure the ends.
After adding each patch, press the unit as it was sewn to set the seam and then open. The SA is automatically pressed towards the last patch added.
Before adding the next patch, take a look to make sure the one you just added covers the space plus seam allowance that it is supposed to.
Steam is optional and usually curls the pattern.
If that bothers you, don't use steam. Sometimes I do. Sometimes I don't.
It truly depends on my mood.
Remember, as you follow this paper piecing tutorial, the printed and the fabric sides of this block are mirror-images of each other.
At last!
Let's sew!
Step 4: Piecing
On the unprinted side of the paper, align the center patch fabric so that the pretty side shows. I like to use a tiny dab of Elmer's Glue stick (the kind that goes on clear and dries purple) to hold this patch in place. You could also use a pin or Scotch Brand Magic tape.
The edges of the square should extend about a 1/4" past the solid lines on the other side of the paper. You should be able to hold this up to the light to line things up.

If you strain to see the stitching lines through the paper, make a mark 1/4" to the outside of the stitching line. (Shown in red, below right.)

Marking two corners should provide an adequate guide for placement.
Align the long edge of a corner triangle, RST(right sides together), with one side of the fabric square.
Turn the square over to the printed side and stitch along the line between Center.1 and Corner.2.
Start stitching about 1/4" before the printed line begins and stop about 1/4" after the printed line ends. The next line of stitching will cross it and secure your stitches.

If the block is big enough, you can stitch the opposite triangle on in the same manner before you press...

...otherwise it's time to press. First with the patch(es) in their 'closed' position to set the seam...

...and now with the patch pressed open. Double check to make sure you haven't accidentally pressed a tuck into the seam allowance.

Trim the points (aka 'dog ears') to clean up the unit. In the picture below the lower dog ears have been trimmed; the upper ones need to be.
If you need to repair torn paper, use Scotch Brand Magic tape. (It perforates nicely when you stitch through it.) Don't iron directly on it.

Add the remaining triangle patches in the same manner.
Pay close attention to the orientation of the patches if you are trying to keep stripes aligned. Hold the patch in place and then flip it open for a quick check (...much faster than ripping out stitches!...)
The square in a square quilt block unit now looks like this...

Step 4: Trim the block
I find it much easier (and reliable) to trim the blocks by aligning the 1/4" line of my ruler on the solid black seam line around the perimeter of the block like this...

...it's just too darned hard to try to align my ruler with the lighter dashed lines that mark the perimeter of the block. (Old eyes, I guess!)
After trimming all sides and removing the paper, your square in a square quilt block is complete and looks like this...

A PERFECT Square in a Square quilt block EVERY time!
Ready for another block?
Browse through our Free Quilt Block Patterns library for another!
What about a different quilt block?
For a list of all the 215+ quilt block patterns on this site, start here.
If you know the name of the block, shorten your search by using these links:
Click here if you're looking for blocks with at least some paper piecing.
Click here if you're looking for the basic building blocks of quilting, i.e., Flying Geese, half square triangles, quarter square triangles, etc., along with several techniques to make each.
And finally, use these links to find blocks in these finished sizes:
For even more blocks to make...

For you, are quilt block designs like potato chips...
...you can't have just one?!!
Check the amazing resources I rely on for all the quilt block designs you see on this website.
To see if they're worthy of a spot in YOUR quilting library, CLICK HERE.
- Home
- Beginner Quilt Blocks
- Square in a Square Quilt Block


Yummy fabrics
to drool over
Click any image below to see the full collection and find pricing and ordering information.


By Julie Baird
Copyright © 2008-2024 Generation Quilt Patterns, LLC
All Rights Reserved
Generations-quilt-patterns.com does not sell any personal information. (See Privacy Policy)