- Home
- Free Quilt Block Patterns
- Path and Stiles Quilt Block
Path and Stiles Quilt Block
From our Free Quilt Block Patterns Library
This post contains affiliate links for which I receive compensation.
Skill Level: Confident Beginner
The Path and Stiles quilt block is a fabulous skill-builder for the beginning quilter. Just half square triangles and a bit of strip piecing.
It doesn't get any easier.
Nesting seam allowances make joining the units together a piece of cake!

Path and Stiles is also known as 'Stiles and Paths' (go-figure?!!), Far West and Shoo Fly. (Click this link for a more common Shoo Fly design.)
Let's get started!
General Instructions
Several common abbreviations are used throughout this tutorial:
- RST - right sides together
- HST - half square triangle(s)
- SA - seam allowance
- BAC - Background fabric
All SA are 1/4" and pressed towards the darker fabric unless otherwise noted.
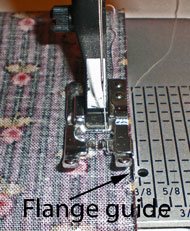
Starching your fabrics before piecing helps keep your rail fence units more accurate.
The starched edge of the strips rides right up against the guide on my favorite quarter inch foot. (You must be able to adjust your needle position to use this foot.)
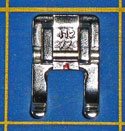
For stitching the HST, I prefer an open toe applique foot because there's nothing to obstruct your view of the needle as it pierces the fabric.
The newest quilt fabrics to tickle your fancy...
Click the images below to see the full collection. We share any commercial and/or free patterns that showcase them, too. (For inspiration, of course!)


Step 1: Cutting patches for a Path and Stiles
 Path and Stiles drawing
Sample Size: 9" finished / 9½" unfinished
Grid: 9x9
Attribution: Nancy Cabot
AKA: Far West (Nancy Cabot), Shoo Fly (Ladies Art Company), Stiles and Paths (Capper's Weekly)
Design Type: Even 9-patch
Choose 3 fabrics with a clear distinction between the values so all your piecing work shows.
The quick pieced method for making HST is used for this block.
If your SA is a perfect 1/4", use the dimensions in the chart below.
If you prefer to cut your HST patches a bit larger, then add a bit to Patches #1 and #2—they are marked with an asterisk (*). (In the sample block, these patches are cut larger.)
After stitching, cut them down to the perfect size. You'll find instructions in the tutorial for this right where you use them.
 | Cutting Chart for a~~Traditional Piecing~~ | ||||
|---|---|---|---|---|---|
| Patch | Fabric | Qty | Finished Block Size | ||
| 9" | 13½" | 18" | |||
| 1* | BAC | 2 | 3-⅞" x 3-⅞" | 5-⅜" x 5-⅜" | 6-⅞" x 6-⅞" |
| 2* | Medium | 2 | 3-⅞" x 3-⅞" | 5-⅜" x 5-⅜" | 6-⅞" x 6-⅞" |
| 3 | BAC | 2 | 1-½" x 16½" | 2" x 23" | 2-½" x 29½" |
| 4 | Dark | 1 | 1-½" x 16½" | 2" x 23" | 2-½" x 29½" |
| 5 | Dark | 2 | 1-½" x 4" | 2" x 5" | 2-½" x 6" |
| 6 | BAC | 1 | 1-½" x 4" | 2" x 5" | 2-½" x 6" |
| Unfinished Block Size | 9-½" | 14" | 18-½" | ||
| Grid Size | 1" | 1-½" | 2" | ||
| *These patches are used for HST. You may wish to cut them a bit larger and then trim to perfection after stitching. | |||||

Step 2: Create the units for a Path and Stiles
Half Square Triangles (HST)
Make 4
Draw a diagonal line on the back of the #1 squares, marking only as dark as you need to see.
With RST layer a #1 and #2. Stitch a 1/4" away from both sides of the drawn line.
 While the line looks pretty light in these photos, it is dark enough to see easily at the sewing machine.
A funny thing happened on the way to making this quilt block...
Don't you just hate it when your quilting tools 'walk away'.
As I prepared the sample block for this tutorial, I marked the center diagonal line—with all intentions of stitching a 1/4" away on both sides.
Unfortunately, my trusty-quarter-inch foot seems to have made an escape from my sewing machine tool kit.
Thank goodness I had my Quick Quarter Ruler on hand. I marked my sewing lines instead and stitched them using an open toe applique foot.
It's a good thing to have more than one 'go-to' method.
 Using an open toe applique foot makes it easier to see where you're sewing!
Repeat for the second pair of #1/#2.
Press flat to set the seams.
Cut apart on the drawn lines.
Press again. SA toward the dark.
If you cut your patches oversized, trim to the dimensions in the chart below that correspond to the finished block size.
If you cut patches exactly, measure to confirm that your HST are the correct size. Adjust as necessary.
For the 9" finished sample, the HST measure 3½" x 3½".
| Finished Block Size | Trim HST to... |
|---|---|
| 9" | 3-½" x 3-½" |
| 13-½" | 5" x 5" |
| 18" | 6-½" x 6-½" |
Below are the HST through the stages: Left cut apart on the drawn line, middle pressed and right trimmed to size.

Rail Fence units
Make 4
With RST stitch a #3 BAC to a #4 dark along the long side.
 Sewing with the light strip on top does make for a pretty boring picture. However, I find it much easier to keep my strips aligned with the darker/brighter one on the bottom.
Press.
I find I get a more accurate stripset by pressing after each strip is added. (It's easier, too!)
Here you can see how flat everything is while adding the third strip (#3).

Measure your stripset to make sure it's the correct width using the chart below.
| Finished Block Size | Stripset Width | Subcut Qty 1 | SubCut Qty 4 |
|---|---|---|---|
| 9 | 3½" | 1½" | 3½" |
| 13½" | 5" | 2" | 5" |
| 18" | 6½" | 2½" | 6½" |
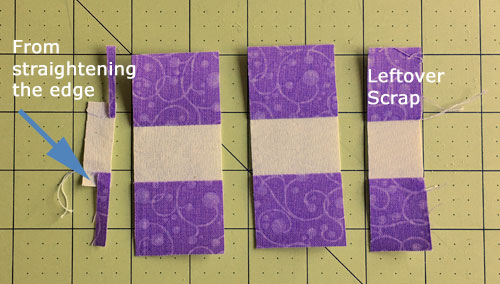
Straighten a short end with your rotary cutter and ruler.
 Blue arrows point to where I've aligned the ruler lines with the seam lines. A quick check confirms this strip set is 3-1/2" wide—perfect for this 9" finished sample.
Subcut the stripset into four square patches and one rectangular one using the measurements from the chart.
 The tiny patch on the right is used in the center 9-patch
Save the narrow subcut for the next step.
9-Patch Center
Make 1
With RST stitch a dark #5 to a BAC #6 along the long edge. Press.
Stitch a #5 to the #6 on the opposite side.
Press.
Use the chart below to subcut this strip set into two units.
| Finished Block Size | Stripset Width | Subcut Qty=2 |
|---|---|---|
| 9 | 3½" | 1½" |
| 13½" | 5" | 2" |
| 18" | 6½" | 2½" |
This is what you've got after straightening the edge and subcutting.
Arrange the patches with the leftover rectangle (below, middle) from the previous section.
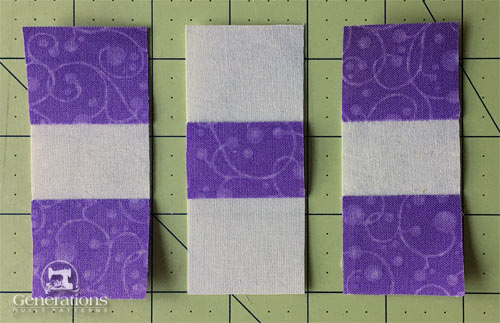
With RST, stitch one #5/#6/#5 to both sides of the #3/#4/#3 from the previous step. Press after the addition of each unit.
 Look, Ma! No pins! :D
If you find your nine patch is a bit lumpy, use this simple pressing technique to squash it into submission.
Step 3: Assemble the Path and Stiles quilt block
Arrange the units into rows; remember the Rail Fence units point into and out of the center.
 Rail Fence units lead out from the center; the dark half of the HSTs is toward the center.
Sew the units into rows.
Press the SA toward the Rail Fence units. Your seams will nest when you sew the rows together. That makes matching them so much easier.

Press these final two seams out from the center.
Here is your finished Path and Stiles quilt block.
 Our finished Path and Stiles
And here it is from the back side.
 Our Path and Stiles from the back... My Mom always told me when I sewed clothes that the inside should be as neat as the outside—the same is true for quilt blocks!
If you choose to set your blocks in an edge-to-edge setting with no sashing, all the seams will nest. If you find a block that doesn't, simply rotate it a quarter turn.
It doesn't get any easier than that!
What about a different quilt block?
For a list of all the 215+ quilt block patterns on this site, start here.
If you know the name of the block, shorten your search by using these links:
Click here if you're looking for blocks with at least some paper piecing.
Click here if you're looking for the basic building blocks of quilting, i.e., Flying Geese, half square triangles, quarter square triangles, etc., along with several techniques to make each.
And finally, use these links to find blocks in these finished sizes:


Yummy fabrics
to drool over
Click any image below to see the full collection and find pricing and ordering information.


By Julie Baird
Copyright © 2008-2024 Generation Quilt Patterns, LLC
All Rights Reserved
Generations-quilt-patterns.com does not sell any personal information. (See Privacy Policy)