- Home
- Paper Piecing
- Paper Foundation Piecing
Paper Foundation Piecing Instructions
Lesson 2: Join the Sections and Finish
This post contains affiliate links for which I receive compensation.

Our paper foundation piecing instructions for our little Sawtooth Star block continue.
It's time to join the Sections together and take a final inspection.
One last press at the ironing broad and finally trim to the exact unfinished size.
Voila!
This block is done!
To Remove the Paper or Not
Some quilters will remove the paper from the blocks at this time.
I, personally, like to leave the majority of the paper in place until the block is finished.
- It adds stability to fabric patches that haven't been cut on grain.
- The printed pattern provides nice lines to stitch on.
- Finally, it also protects the block from over pressing--you know the kind--where you press so hard and so often that the seam allowances shine on the front side of the block.
For these reasons, I leave most of the paper on the block.
To get used to this method of paperpiecing, do give it a fair try by piecing several blocks with the paper on. It will take awhile to get used to handling the extra layer of paper.
Let's get back to our Sawtooth Star paper foundation piecing instructions...
Trimming Inside Seam Allowances
Step 1
Trim the seam allowances on the inside of the block, only. (We will trim the outside seam allowances at the end.)
Place the 1/4" line of the ruler along the solid black line. The edge of the ruler should line up with the light dotted line that marks the outside edge of the unfinished block. Trim with a rotary cutter and ruler.
For Sections A and D that means you'll be trimming three sides. Don't trim the side with either A1 or D1.
For Sections B and C, only trim the side opposite Piece C1 and B1.

Step 2
Remove the paper from piece A4. This is because A4 is a simple square.

Join Section D to Section A. Because Section D still has the paper attached, put Section D on top.
When I join Sections together in paper foundation piecing, I do like to pin to keep things nicely aligned.

Unlike the stitching within sections, here where we are joining sections stitch your seam from edge to edge.

Press the seam allowance toward Section A, the center. We will now call this joined unit Section AD.
 Unit AD, front
 Unit AD, back
Step 3
Join Section B to Section AD. Because of the order of piecing, the seam allowances will nest.
Use pins to hold things in place for stitching.
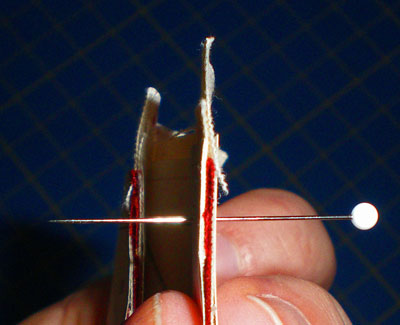
Because we haven't trimmed the outside edge, insert a pin through the upper right corner of the B5 patch to match it to the upper left point of A1. Pin in this same manner for the lower right corner of B4 and lower left point of D1. The key here is to make sure the pin is perpendicular to the piece. This ensures the block won't shift as you sew.
Add a pin on each side of the perpendicular pin. I leave the perpendicular pins in place until just before I sew them.
Stitch the seam from edge to edge. Press toward Section AD or the center.
[Learn more about pinning for perfect points...]
 Perpendicular pinning, front
 Perpendicular pinning, back
This may seem like a bit of overkill for our simple Sawtooth Star block.
However, it's good practice for when you move on to more intricate paper piecing patterns with more difficult points to match. And this practice will make you a better paper piecer.
Step 4
Join Section C to Section ABD in the same manner as you joined B to AD in Step 3. Press the seam allowance towards Section ABD, the center.
Your Sawtooth Star quilt block is completely assembled.
The front of the block looks like this:

The back of the block looks like this:

Our paper foundation piecing instructions continue with...
Trimming the Joined Sections
Step 1
Measure your quilt block on the solid black line that goes around the outside perimeter. It should measure 3"--the finished measurement of this star block.
Also note, that if it's been stitched well, this black line will create a smooth, continuous square outline.
If it doesn't, check to make sure that your seam allowances are correct. Re-stitch where necessary.
Step 2
When the block measures 3" on the solid black line, lay the quarter inch mark of your ruler on this line on one side of the block and trim with a rotary cutter and mat.
Repeat for the remaining three sides.

The trimmed block should measure 3-1/2". With it's nice, smooth, even sides, it will be a dream to piece into any quilt.

This completes our paper foundation piecing instructions for our 3" finished Sawtooth Star quilt block.
If you've followed along and stitched your own block, you are now an OFFICIAL PAPER PIECER!
Congratulations!
My must-have tools for paper piecing
Most of the tools you'll need for paper piecing, you likely already have. (Whew!!!!)
Compare your current inventory with the recommendations in 'Essential Paper Piecing Skills: The right tools for the job'.
In the meantime, these are the three must-haves in my paper piecing toolbox.


By Julie Baird
Copyright © 2008-2024 Generation Quilt Patterns, LLC
All Rights Reserved
Generations-quilt-patterns.com does not sell any personal information. (See Privacy Policy)