This post contains affiliate links for which I receive compensation
Machine quilting: wavy borders
by MJ
(Canada)

I have free motion quilted the inside of an appliqued wall hanging and then straight stitched in the ditch between the inside edge of the border and flange. Now the border is wavy and not square anymore. (I think it was square before I quilted the centre.) I did not baste around the outside edge of the border yet.
What should I do to get rid of the waves? Will the same density of free motion quilting solve my problem? One corner seems to be off more than the others.
Reply
First, thank you so much for including a photo. I love to see what quilters are working on, and it really helps me to be able to help you!I love your Santa!
It looks like you've used a cotton batting. For cotton batting I recommend keeping the amount of quilting even over the surface of the quilt to avoid creating a finished quilt with ripples or waves.
What you've seen is that as you've added more quilting stitches to the center, those stitches 'draw up' or 'shrink' the space, while the border, without any stitches in it, is its original size.
That's what makes the waves.
The more quilting in the center, the more wavy the border is...at this point in the quilting process.
You are correct. Adding the same density of quilting to the border will do a lot to tame most, if not all, of the waviness.
But you'll have to take care as you are stitching. At this point, it's easy to accidentally stitch tucks of fabric into your quilting on both the front and back side. (Yes, I've done it!)
What I recommend you do before quilting the border is to re-baste it with pins. Take care as you go to pin the layers evenly together. It'll still look kind of wavy, but don't worry.
You have a secret weapon...
Straight pins!
I know, who'd a thunk it!My favorites for this task are Clover's Flower Head Pins because they lay flat with less distortion.
Straight pins are easy to add into smaller areas. I'm not talking about pinning a whole side with straight pins (you'd be sticking yourself all the time), but just smaller areas to tame the 'bubbles' of fabric as they appear. And these pins are so easy/fast to put in and take out.
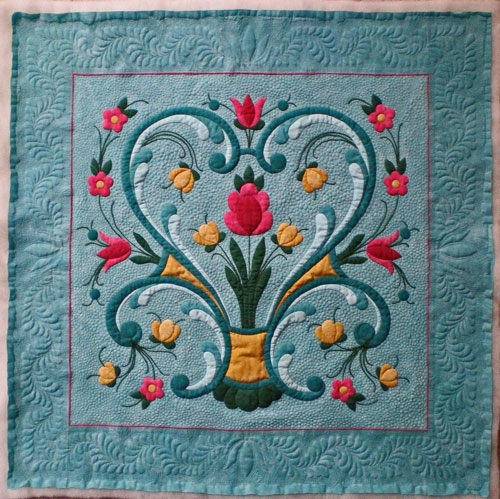
In this Rogaland Rosemaling quilt that I was working on (see below) there's just a ton of tiny stitching in the center. Even though I used a wool bat (which can accomodate uneven quilting on a quilt), my borders were really wavy without any quilting in them.

Quilt Pattern by Trudy Wasson
If you look at the edges of this quilt, you can get an idea of how much wave there was.
To top it off, I hadn't yet designed the feathers for the border when I started the quilting...'just too anxious to get going...so the design had to be marked onto that wavy border. Ugh! Not fun!
After marking, I went back and added safety pins about 2-3 inches apart avoiding the spines of the feathers. I stitched the motif in the center of each border first, adding straight pins to help hold the quilt's layers and excess fabric in place when I needed. Next came the feathered plumes and finally, the echo stitching.
Think of it like when you're attaching a border that isn't the same size as the center field of blocks.
You pin the centers and quarters of the border to the centers and quarters of the center. Then you use more pins to evenly distribute the excess fabric between those pins.
That's really what you're doing with your quilt sandwich and the straight pins. Distributing the excess in smaller but equal portions of your border.
If it's of and help, the general order of quilting that I follow is outlined on the page "Where to start free motion quilting?" All of the initial ditch or stabilizing quilting helps to contain any excess fabric in the quilt top to one area.
I hope this advice is helpful to you. You CAN get this finished and tame the waves. It just a part of the process. Take your time and remember to breathe!
If you have other questions as you move through the process, please do let me know through the comment link below and I'll do my best to help!
Piecefully,
Julie Baird
Editor
Comments for Machine quilting: wavy borders
|
||
|
||


