- Home
- Free Quilt Block Patterns
- Love and Kisses Quit Block
Love and Kisses Quilt Block
From our Free Quilt Block Patterns Library
This post contains affiliate links for which I receive compensation.
Our Love and Kisses quilt block takes advantage of half square triangles made 8-at-a-time and twirling seam allowances to make construction a breeze.
Just follow the pressing directions.
Everything nests!
Block assembly is Easy Peasy, Lemon-Squeezey!
It's time to cut up and sew!

General Instructions
Several abbreviations are used on this page. They are:
- SA - seam allowance
- RST - right sides together
- HST - half square triangles
1/4" SA are used through this tutorial.
When instructed to press, first press the patches in the closed position just as they came off your sewing machine. This sets the seam, melding the fibers of the threads into the fibers of the fabric. Then press as directed.
As always, I'm a huge fan of starching your fabric before cutting. In my opinion your cutting is more accurate and it's helpful to be able to fingerpress your seams instead of jumping back and forth everytime to the iron.
A 50/50 mixture of StaFlo liquid starch concentrate to water is my preference.
The newest quilt fabrics to tickle your fancy...
Click the images below to see the full collection. We share any commercial and/or free patterns that showcase them, too. (For inspiration, of course!)


Step 1: Cutting for a Love and Kisses quilt block
 Love and Kisses design
Sample Size: 9" finished / 9½" unfinished
Grid: 6x6
Design Type: Even 9-patch
I love fabrics with writing on them.
Do you?
Two are used in the sample block. The finished block turned out really nice.
As always, contrast is key when you've got blocks with points. You need enough so that all your piecing shows.
 | Cutting Chart for a~Traditional Piecing ~ | |||||
|---|---|---|---|---|---|---|
| Patch | Fabric | Qty | Finished Block Size | |||
| 6" | 9" | 12" | 15" | |||
| 1 | L | 1 | 4¼" x 4¼" | 5¼" x 5¼" | 6¼" x 6¼" | 7¼" x 7¼" |
| 2 | D | 1 | 4¼" x 4¼" | 5¼" x 5¼" | 6¼" x 6¼" | 7¼" x 7¼" |
| 3 | L | 8 | 1½" x 1½" | 2" x 2" | 2½" x 2½" | 3" x 3" |
| 4 | D | 1 | 1½" x 10" | 2" x 13" | 2½" x 16" | 3" x 19" |
| 5 | L | 1 | 1½" x 10" | 2" x 13" | 2½" x 16" | 3" x 19" |
| 6 | L | 2 | 1½" x 2½" | 2" x 3½" | 2½" x 4½" | 3" x 5½" |
| 7 | D | 1 | 2½" x 2½" | 3½" x 3½" | 4½" x 4½" | 5½" x 5½" |
| Unfinished Block Size | 6½" | 9½" | 12½" | 15½" | ||
| Grid Size | 1" | 1½" | 2" | 2½" | ||
Step 2: Assemble the units for Love and Kisses
NOTE: We'll be 'twirling' or 'fanning' the SA to reduce bulk.
 Corner (left) and four patch (right) units with SA twirled to reduce bulk in the center.
To make this technique work to your advantage, SA must be pressed in the direction instructed.
Please pay careful attention to the stitching and pressing directions as you work through the block.
Corners
Make 4
 Make 4
The Love and Kisses block needs 8 HST to make the corners. We'll use the 8-at-a-time method to make them. Just the right amount!
If you're planning on a quilt full of Love and Kisses you may want to consider using triangle paper for even more efficient piecing.
To begin, mark a diagonal line from corner to corner on the backside of either the #1 or #2 square. Choose whichever one is easier to see your markings on. Mark just dark enough to be able to see at your machine.
Stitch a quarter inch away from both sides of both lines for a total of four lines of stitching.
The photo below shows what happens when you don't have the right quarter inch foot in your accessories case.
On the day I created this sample, I left the 'right' foot at home.
What to do?
Here I simply marked the stitching lines a 1/4" from both sides of each center diagonal marked line. Then installed my open toe applique foot and stitched directly on the four outside lines.
There's always more than one way to get thing done in quilting!
 Open toe applique foot to the rescue!
Press the sewn pair of patches flat to set the seams.
Move to your cutting mat.
I like to use a rotating rotary mat for this.
Yes, it's expensive. I would have never bought it for myself. Thank goodness it was gifted to me. When it wears out, I WILL replace it...it's that terrific.
The next step is to cut the #1/#2 into four equal squares; then into eight equal HST.
Use the chart below.
Find the Center/Midpoint Measurement that corresponds to your finished block size.
HST Dimensions | ||
|---|---|---|
| Finished Block Size | Center/Midpoint Measurement | Trim HST to… |
| 6" | 2⅛" | 1½" |
| 9" | 2⅝" | 2" |
| 12" | 3⅛" | 2½" |
| 15" | 3⅝" | 3" |
Align the Center/Midpoint measurement on your ruler with the edge of the #1/#2 unit.
Cut through the center.
 For the 9" finished sample block, the center/midpoint is 2-5/8".
Turn the mat a quarter turn and repeat to create four equal squares.
 One more set of cuts, then on to trimming to perfection!
So far so good, eh?!!!
Now cut each square in half on the middle diagonal line. You can just barely make that marking out in the photo above.
Press the resulting HST (SA to the dark) and trim to the size that corresponds to your finished block size found in the chart above.
These are your perfect little HST.
 Just a little wasted fabric...the price of perfection!
To assemble the corner units, with RST add a #3 square to the #2 side (red fabric in the photo below) of each HST. Make 8 exactly the same.
Use the photo below for correct placement.

Press the SA toward the #3 square, away from the HST.
With RST, join two of these units together. The SAs nest making matching the seam line so much easier.

Feed the pairs through your sewing machine with the #3 square on top and feeding first into your machine.
 The #3 square must feed through first so that the seams twirl in the correct direction. SA (blue arrow) is pointing towards the #3 patch.
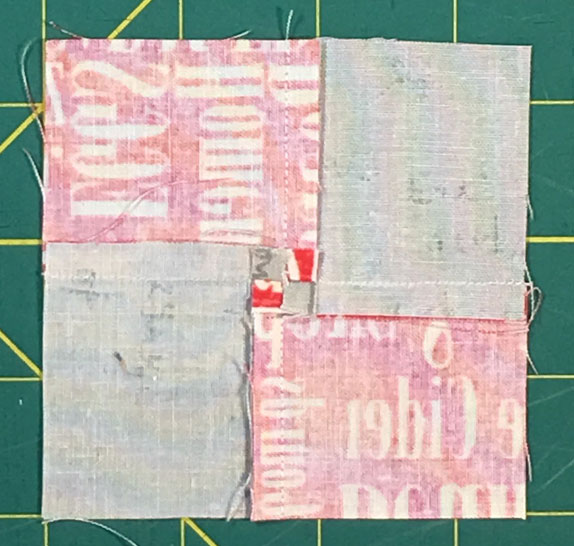
After stitching, pull the stitches away from the center without cutting any threads. You may need to loosen them with the point of your seam ripper.
Then press so that the back of the block looks like this.
 The back after twirling the seams. See how the threads are loosened and NOT cut in the center. The seam 'twirls' clockwise around the block.
Four Patches (Top and Bottom sides)
 Make 2
Make 2
With RST, sew the #4 and #5 strips together along their long edges.

Press with the SA toward the light #5.
Use the chart below to check the accuracy of your stitching. If your strip set is wider or narrower than it should be, correct it now.
Find the subcut width that corresponds to your finished block size.
StripSet Widths | ||
|---|---|---|
| Finished Block Size | Stripset Width after stitching | SubCut Width |
| 6" | 2½" | 1½" |
| 9" | 3½" | 2" |
| 12" | 4½" | 2½" |
| 15 " | 5½" | 3" |
At your cutting mat, straighten one short edge of your stripset.
To do so, place a line on your ruler (blue arrow) directly over the seamline, trimming away roughly 1/8" to 1/4".

Subcut into 6 units. Set two aside.
With the remaining four, make two four patches as shown below.

Then loosen the stitches in the center of the four patch to twirl the seam. Don't cut the thread tails.
 The twirled SA makes a four-patch on the back side of the block.
Left and Right Sides
 Make 2
Make 2
Add a #6 to the two remaining #4/#5 pairs. Use the photo below placement of the patches.

Press the SA toward the #6 rectangle.
Step 3: Assemble your Love and Kisses quilt block
At last we're ready to assemble the Love and Kisses.
Arrange your patches as shown in the photo below.
- Solid #3 squares in the four corners.
- Four patches middle of the top and bottom rows with the dark #4 in the upper left.
- #4/#5/#6 patches on the left and right sides.

Double check placement one last time. (Seriously, it sucks to have to rip things out this close to the finish!)
With RST stitch the units in each row together.
If you've followed the directions for pressing the SA, all the seams that should nest, do nest.
That makes putting the block together a whole lot easier.

Stitch the rows together.
Here is Love and Kisses from the backside so that you can see how all the nesting works to your advantage.
 Everything nests on the back side
And finally. The finished Love and Kisses quilt block from the front.
 Love and Kisses for your next quilt!
What about a different quilt block?
For a list of all the 215+ quilt block patterns on this site, start here.
If you know the name of the block, shorten your search by using these links:
Click here if you're looking for blocks with at least some paper piecing.
Click here if you're looking for the basic building blocks of quilting, i.e., Flying Geese, half square triangles, quarter square triangles, etc., along with several techniques to make each.
And finally, use these links to find blocks in these finished sizes:


Yummy fabrics
to drool over
Click any image below to see the full collection and find pricing and ordering information.


By Julie Baird
Copyright © 2008-2024 Generation Quilt Patterns, LLC
All Rights Reserved
Generations-quilt-patterns.com does not sell any personal information. (See Privacy Policy)