- Home
- Free Quilt Block Patterns
- Indiana Puzzle Quilt Block
Solve the Indiana Puzzle Quilt Block
From our Free Quilt Block Patterns Library
This post contains affiliate links for which I receive compensation.
The Indiana Puzzle quilt block is a variation on the Friendship Star block—whose star-power is bumped up with the addition of 4 triangle squares in the corners.
It's the perfect opportunity to practice the 8 at a time method for making these units.
Only two lines to mark and four to stitch.
It doesn't get much easier than that!
To complete the block, these 8 HST surround a Square in a Square (SIAS) unit.
Directions are included to either paper piece or use connector corners to complete it. Choose the method that works best for you!
The only puzzle to solve is just how many you'll make.
Let's get started!

General Instructions
Several abbreviations are used in this Indiana Puzzle tutorial:
- SA - seam allowance
- HST - half square triangle
- SIAS - Square in a Square unit
- RST - right sides together
1/4" seam allowances (SA) are used throughout.
Patches are first pressed closed (just as they are stitched) to set the seam, then open with the SA to the dark unless otherwise indicated.
Step 1: Download and print the paper piecing pattern for the SIAS unit
Since I prefer the accuracy of paper piecing over rotary cutting for the a SIAS, there is a free pattern to download.
Choose your finished block size from the list below and print one copy. You'll only use 1 unit.
| PRINT the Paper Piecing Patterns | ||
|---|---|---|
| Finished Block Size | Link to PDF Pattern | |
| 6" | 2” | |
| 9" | 3” | |
| 12" | 4" | |
You'll need the most recent copy of Adobe installed on your computer. Download it here if you don't have it.
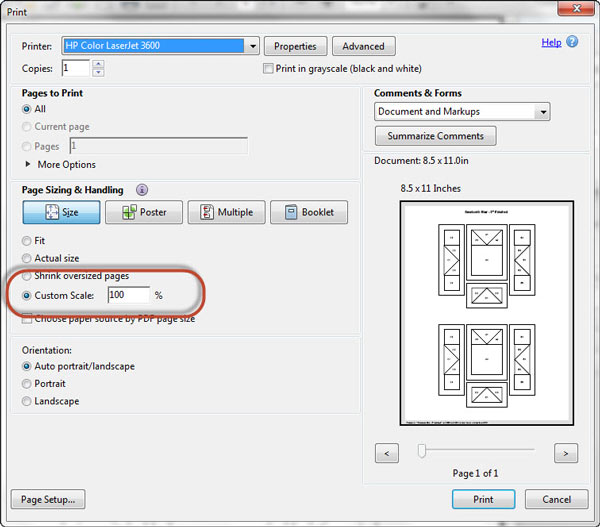
In order to print the blocks correctly, under 'Page Sizing and Handling' in the Adobe print menu, set 'Custom Scale' to 100%. Click here to see what it looks like on the Print Menu page.
The newest quilt fabrics to tickle your fancy...
Click the images below to see the full collection. We share any commercial and/or free patterns that showcase them, too. (For inspiration, of course!)


Step 2: Cutting Indiana Puzzle patches
 Indiana Puzzle design
Sample Size: 9" finished / 9½" unfinished
Grid: 3x3
Attribution: Ruby McKim
Design Type: Star | Even 9-patch
With just two fabrics to make this Indiana Puzzle, the 8-at-a-time HST method is perfect for our needs.
No waste either!
In the chart below, all the patches are squares, i.e., when you see 1-7/8" that means to cut a 1-7/8" by 1-7/8" patch.
Remember to subcut the Corner patches in half once diagonally.
 | Cutting Chart for an~Traditional & Paper Piecing ~ | |||||
|---|---|---|---|---|---|---|
| Patch | Fabric | Qty | Finished Block Size | Sub Cut | ||
| 6" | 9" | 12" | ||||
| Center | L | 1 | 1⅞" | 2⅝" | 3⅜" | na |
| Corner | D | 2 | 2⅜" | 2⅞" | 3⅜ | |
| 3 | L | 1 | 6¼" | 8¼" | 10¼" | na |
| 4 | D | 1 | 6¼" | 8¼" | 10¼" | na |
| Unfinished Block Size | 6½" | 9½" | 12" | na | ||
| Grid Size | 1" | 1½" | 2" | na | ||

Alternate Method/Cutting for SIAS unit
In this tutorial the unit is paper pieced for accuracy.
If paper piecing just isn't your thing, use Connector—or Folded—corners instead. Substitute the patches below for this method.
| CUTTING CHART for SIAS unit ONLY Made using Connector Corners | Finished Block Size | |||||
|---|---|---|---|---|---|---|
| Patch | Fabric | Qty | 6 " | 9 " | 12" | |
| Center | L | 1 | 2 1/2" | 3 1/2" | 4 1/2" | |
| Corner | D | 4 | 1 1/2" | 2" | 2 1/2" | |
Click here for a tutorial to show you how to construct this unit using Connector Corners.
Step 3: Create the units for the Indiana Puzzle
Half Square Triangles (HST)
Make 8
The 8 at a time method works perfectly for our Indiana Puzzle—and no leftovers!
Mark the back of your #3 patch with two diagonal lines. Layer this marked patch right sides together (RST) with the #4 patch.
Stitch a 1/4" inch away from the marked lines on both sides for a total of 4 lines of stitching.
 You can just make out my pencil lines. For this 9" finished sample block I used my flower head pins to help hold the layers evenly together.
After the sewing is complete, give the unit a quick press and it's onto cutting this patch into the HST units.
Locate the Center that corresponds to your Finished Block Size from the table below.
| Finished Block Size | Center | Trim HSTs and SIASs to... |
|---|---|---|
| 6" | 3-1/8” | 2 1/2" |
| 9" | 4-1/8” | 3 1/2" |
| 12" | 5-1/8” | 4 1/2" |
At your cutting mat, align the line on your ruler that is the Center with one side of the sewn squares.
The opposite edge of your ruler should pretty much bisect your stitching lines. If it's off a wee bit, don't worry, there's a bit of extra built into the squares on purpose.
 The Center for our 9" finished block is 4-1/8". Cut on the opposite side of the ruler through the center of the patches.
Rotate the patches a quarter turn. Use the same measurement to cut the patches in half again to create four equal sized squares.
Cut each apart diagonally on the drawn line between the stitching.
Press your eight HST units, SA towards the dark.
Trim to the size indicated in the chart above.

Center - SIAS
Make 1
If you'd prefer to make this unit using connector corners and have cut the patches from the second cutting chart, then click here for those instructions.
To paperpiece SIAS, set up your machine for paper piecing. Reduce your stitch length to 1.5mm (15-18 stitches/inch) and install an open toe applique foot if you have one.
With a dot of Elmer's Washable Glue Stick (the one that goes on purple/dries clear) position the wrong side of Center.1 on the unprinted side of the pattern. It's edges should extend approximately 1/4" past the solid line around Center.1 shown below.

Now with RST, position a Corner.2 triangle centered along the edge of the first patch. The point of the triangle lines up with the corner (blue arrow below).

From the printed side, stitch on the line between the two patches, starting and stopping a 1/4" before and after the solid line. Subsequent lines of stitching will lock these in place.
Repeat for the remaining Corner patches. You can usually stitch two opposite corners and then press for the larger sized units.
After stitching, give the unit one final press.
Trim to perfection by placing the 1/4" line of your ruler on the solid outer line and cut off the excess. Repeat for all sides. Remove the paper.
For more detailed instructions for this unit, click here.
With paper piecing, it turns out perfect every time!

Step 4: Assemble your Indiana Puzzle quilt block
Install your favorite quarter inch presser foot and return your stitch length to its regular piecing length.
Arrange the patches into the Indiana Puzzle design as shown below.

Sew the units into rows. Notice in the photo below that the top and bottom rows are identical. (The bottom row is flipped vertically to put it in the proper position.

Press the SA in the direction of the white arrows below.
 Press SAs in the direction of the arrows for seams that nest.
Stitch the rows together.
I pin, especially when I want the points to match precisely.
 The arrow points to the matching pin I inserted perpendicularly through the points of the two HSTs I want to match.
Give your block a final press. (Try my favorite pressing technique for truly flat quilt blocks.)
Congratulations! Your Indiana Puzzle quilt block is finished!

Looking for something truly stellar?

You've finished your star quilt block, and you're ready for more!
Browse our collection of 50+ stellar star quilt block patterns. All have instructions and cutting charts in multiple sizes. If templates or paper piecing is used in the tutorial, there's a free download for you of those materials.
Eeny. Meenie. Miney. Moe.
Which star quilt block will you sew?
For a star-studded quilting experience, choose from 100+ bedazzling star quilt patterns—for beginners and beyond—click here.

For EVEN MORE blocks to make, visit our Free Quilt Block Pattern Library, with over 220+ blocks to choose from in multiple sizes.
Free downloads are included in all sizes for any blocks require paper piecing patterns or templates.
What about a different quilt block?
For a list of all the 215+ quilt block patterns on this site, start here.
If you know the name of the block, shorten your search by using these links:
Click here if you're looking for blocks with at least some paper piecing.
Click here if you're looking for the basic building blocks of quilting, i.e., Flying Geese, half square triangles, quarter square triangles, etc., along with several techniques to make each.
And finally, use these links to find blocks in these finished sizes:
- Home
- Free Quilt Block Patterns
- Indiana Puzzle Quilt Block


By Julie Baird
Copyright © 2008-2024 Generation Quilt Patterns, LLC
All Rights Reserved
Generations-quilt-patterns.com does not sell any personal information. (See Privacy Policy)