- Home
- Free Quilt Block Patterns
- Hidden Star Quilt Block
Hidden Star Quilt Block
From our Free Quilt Block Patterns Library
This post contains affiliate links for which I receive compensation.
Our Hidden Star quilt block is made using a bit of paper piecing and quick pieced half square triangles. Perfect units make blocks super easy to assemble accurately. Quickly.
Hate paper piecing?
Not to worry!

There's always more than one way to get things done in quilting.
A separate cutting chart and instructions are provided if you prefer to skip the paper piecing.—it uses connector corners instead.
You choose which technique suits YOU better.
Ready?
Time to cut up and sew!
General Instructions
A bunch of abbreviations are used on this page. They are:
- SA - seam allowance
- RST - right sides together
- BAC - background fabric
- CC - connector corners
- HST - half square triangle
- SiaS - square in a square
- C.2, C.3, C.4, C.5 - Corner.2, Corner.3 etc.

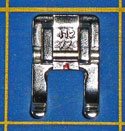
I like to use an open toe applique presser foot for sewing the HST and paper piecing. There's nothing between your eyes and the stitching line.
SA are 1/4" and pressed towards the darker fabric unless noted otherwise.
Starched quilt fabric is easier to work with (IMHO) whether you are paper piecing or using connector corners.
Learn more about starching here.
I prefer to use StaFlo liquid starch concentrate, mixing it 50/50 with water. The fabric is quite stiff after drying and pressing.
Best Press is a good alternative if you prefer less stiffness.
Optional: Download and print paperpiecing pattern
If you choose to make the Square in a Square units using the Connector Corners method, skip this 'Optional' section.
You'll need the most current version of Adobe installed on your computer to download the pattern.
On the Adobe Print Menu page, under 'Page Size and Handling' set 'Custom Scale' to 100% before printing for accurate results. Click here to see what it looks like on the Print Menu page.
Choose your finished block size from the chart below and print the # of copies indicated.
Print the SiaS Units | ||
|---|---|---|
| Finished Block Size | # of Copies to Print | Link to PDF Download |
| 6" | 1 | 2" |
| 9" | 1 | 3" |
| 12" | 2 | 4" |

Not sure which paper to use?
Take a look at my review of several of the most popular brands available to us quilters on the market.
You want a super-easy paper to tear away—less stress on the stitches.
After printing, follow the information on the printed page to make sure it printed correctly.
Then cut out each unit a bit outside the printed line. There's no extra points here for perfect cutting. The excess will be taken care of after the SiaS is complete.
The newest quilt fabrics to tickle your fancy...
Click the images below to see the full collection. We share any commercial and/or free patterns that showcase them, too. (For inspiration, of course!)


Step 1: Cutting for a Hidden Star block
 Hidden Star design
Sample Size: 9" finished / 9½" unfinished
Grid: 6x6
Design Type: Even 9-patch, Star
For the sample Hidden Star, I've chosen a darker, busier fabric (Kaffe Fasset's 'Paperweight'—one of my favorites!) for the background instead of the light shown in the diagram here.
Remember. Fabric placement is merely a suggestion.
You are in charge of your block.
Each cutting chart below is complete.
Choose the first one if you like paperpiecing; the second one if you want to avoid it.
Includes Paperpiecing
 | Cutting Chart for a~Paper AND Traditional Piecing ~ | |||||
|---|---|---|---|---|---|---|
| Patch | Fabric | Qty | Finished Block Size | Sub Cut | ||
| 6" | 9" | 12" | ||||
| 1** | BAC | 2 | 2⅞" x 2⅞" | 3⅞" x 3 7/8" | 4⅞" x 4⅞" | na |
| 2** | Dark | 2 | 2⅞" x 2⅞" | 3 7/8" x 3 7/8" | 4⅞" x 4⅞" | na |
| Center.1 | Dark | 4 | 1⅞ x 1⅞" | 2⅜" x 2⅜" | 3⅛" x 3⅛" | na |
| C.2, C.4 | BAC | 4 | 2⅛" x 2⅛" | 2⅞" x 2⅞" | 3⅛" x 3⅛" | |
| C.3, C.5 | Med | 4 | 2⅛" x 2⅛" | 2⅞" x 2⅞" | 3⅛" x 3⅛" | |
| 6 | BAC | 1 | 2½" x 2½" | 3½" x 3½" | 4½" x 4½" | na |
| Unfinished Block Size | 6½" | 9½" | 12½" | na | ||
| Grid | 1" | 1½" | 2" | na | ||
| **I prefer to cut my patches extra large for HST, stitch, and then trim them to size. If you prefer to do the same, add a bit extra to the measurements for Patches #1 and #2 above. There is a chart further down in these instructions where you need it for trimming them to size. | ||||||
No Paperpiecing
Cutting Chart for a~Traditional Piecing w/Connector Corners ~ | ||||||
|---|---|---|---|---|---|---|
| Patch | Fabric | Qty | Finished Block Size | |||
| 6" | 9" | 12" | ||||
| 1** | BAC | 2 | 2⅞" x 2⅞" | 3⅞" x 3⅞" | 4⅞" x 4⅞" | |
| 2** | Dark | 2 | 2⅞" x 2⅞" | 3⅞" x 3⅞" | 4⅞" x 4⅞" | |
| Center.1 | Dark | 4 | 2½" x 2½" | 3½" x 3½" | 4½" x 4½" | |
| C.2, C.4 | BAC | 8 | 1½" x 1½" | 2" x 2" | 2½" x 2½" | |
| C.3, C.5 | Med | 8 | 1½" x 1½" | 2" x 2" | 2½" x 2½" | |
| 6 | BAC | 1 | 2½" x 2½" | 3½" x 3½" | 4½" x 4½" | |
| Unfinished Block Size | 6½" | 9½" | 12½" | |||
| Grid | 1" | 1½" | 2" | |||
| **I prefer to cut my patches extra large for HST, stitch, and then trim them to size. If you prefer to do the same, add a bit extra to the measurements for Patches #1 and #2 above. There is a chart further down in these instructions where you need it for trimming them to size. | ||||||

Step 2: Assemble the units
HSTs
Make 4

Mark the backs of either the #1 or #2 squares (but not both) with a diagonal line. For our sample I've marked the #2 with my Bohin Mechanical Chalk Pencil (my favorite!)
With RST layer a #1 and #2. With your quarter inch foot installed stitch a quarter inch away from both sides of the line.
You can see in the picture below that I AGAIN forgot to pack my quarter inch foot for my Sunday Sew-In with my quilting buds. Nuts!
So I marked the stitching lines a quarter inch from both sides of the original. Snapped on my open toe applique foot (shown in the photo below) and completed the sewing for these HST units.
 There's more that one way to get things done — using my open toe applique foot instead of my 1/4" foot.
Press the pairs flat to set the seam.
Cut apart on the center drawn line.
Press with SA toward the dark #2.
 Stitched (left), pressed (middle), trimmed (right)
Use the chart below to check the accuracy of your stitching.
If you cut oversized patches like I do, there'll be a bit of trimming. If you cut them exactly and your stitching is accurate all that's left to do is trim off the dog ears.
HST Dimensions | |
|---|---|
| Finished Block Size | Trim HST to… |
| 6" | 2½" |
| 9" | 3½" |
| 12" | 4½" |
The trimmed HSTs look something like this.

SiaSs - Paperpieced

Make 4
Start here for paperpiecing instructions (blue cutting chart).
Click here for connector corner instructions (yellow cutting chart).
General Sewing Machine Setup for Paperpiecing
- Reduce your stitch length to 16-20 stitches per inch (1.3-1.6mm). This perforates the paper. It also stabilizes the seam when you remove the pattern. [Learn more about stitch length here.]
- Reduce your machine's speed or just plain slow down when you stitch. Sew only as fast as you can stay on the stitching lines.
- Install an open toe applique foot (sometimes called an 'embroidery' or 'satin stitch' foot) if you have one (it's easier to see where you're stitching with one installed).
- Use a larger needle (90/14) if you have problems removing the pattern.
- As you stitch each seam, start and stop a generous 1/4" before and after the solid stitching lines. ALWAYS. Future lines of stitching secure the ends.
After adding each patch, press the unit as it was sewn to set the seam. Then press it open. The SA is automatically pressed towards the last patch added.
Steam is optional and usually curls the pattern.
If that bothers you, don't use steam. Sometimes I do. Sometimes I don't.
It really just depends on my mood.
Remember, as you follow this paper piecing tutorial, the printed and the fabric sides of this block are mirror-images of each other.
At last!
Let's sew!
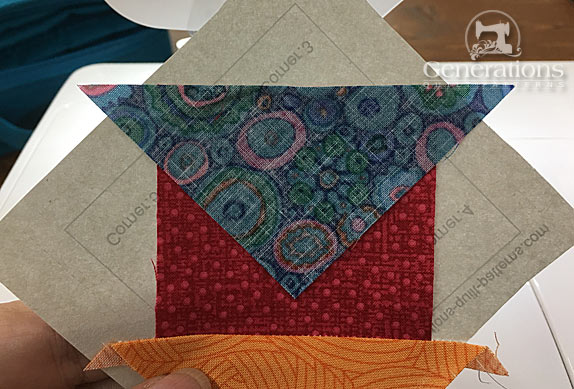
Use a tiny dab of Elmer's Washable Glue stick to hold the wrong side of the Center.1 patch to the unprinted side of the pattern.
The edges of Center.1 should extend 1/4" beyond the solid line. You can just see them shadowing through below.

With RST, align the long edge of the C.2 with the Center.1 edge.
 The point of the C.2 patch aligns with the corner of the pattern (blue arrow).
Stitch starting 1/4" before and ending 1/4" after the solid line between Center.1 and C.2.

Fingerpress C.2 out of the way (no need to jump up to the iron just yet!).
With RST position C3 along the opposite edge of Center.1.
Stitch.
 See how the stitching extends all the way to the edge of the pattern
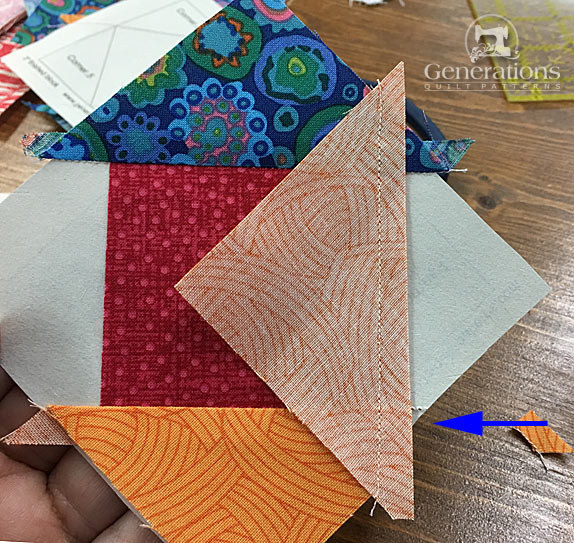
With RST, align the long side of C.4 with Center.1.
Stitch as before.
Before pressing, trim away the dog ears (it's easier to do it now). The arrow points to where the first has been trimmed away.
Repeat for C.5, stitching and trimming as before.
Now give the unit a final press. This time at the iron.
To trim the blocks to size, lay the 1/4" line of your ruler directly on top of the solid outside line.
Trim with your rotary cutter.

After trimming, your SiaSs look like this.
 The trimmings are to the right of the patches
Return your sewing machine to your everyday settings.
We stitch the remainder of the block with traditional techniques.
Install your favorite quarter inch presser foot. Adjust the needle position if needed. Increase to your normal piecing stitch length.
SiaSs - Connector Corners
Make 4
Patches: Center.1, Corner.2, .3, .4 and .5
Click here for instructions to make the SiaSs using the CC technique.
Just as in the paperpiecing method, you'll be adding alternate fabrics to opposite sides of the square.
 I start my stitching on a scrap of fabric for a better first stitch that doesn't 'eat' my fabric.
After adding C4 and C5, your SiaS made with connector corners looks like this.
 The excess trimmed from the SA is to the left.
Repeat for all four units.
Step 3: Assemble the Hidden Star quilt block
If you haven't already done so, remove the paper pattern from the SiaSs.
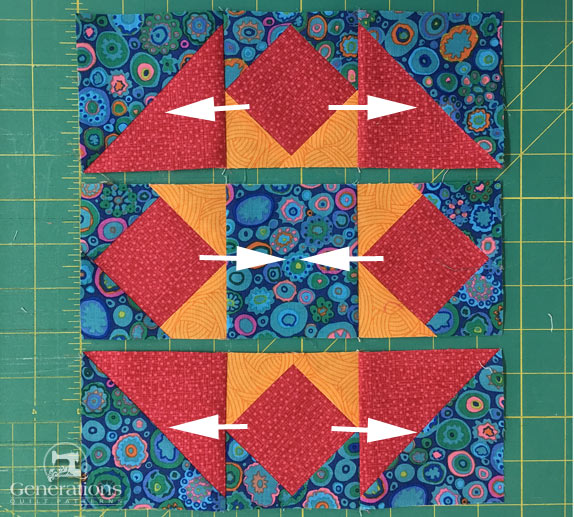
Arrange the units into the Hidden Star design. The background fabric is on all the outside edges.

With RST, stitch the patches in each row together, pinning as needed.
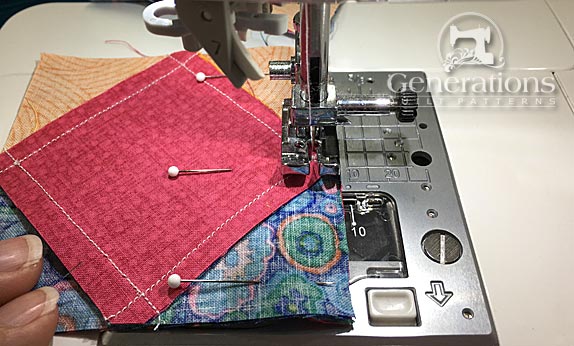
Press SA in the direction of the arrows in the photo below.
Finally, with RST stitch the rows together. SiaS units can get a bit lumpy in the SAs.
Use my favorite pressing technique to smush the lumps into submission the easy way.
This is the finished Hidden Star block from the front...
 Our Hidden Star just sparkles!
...and from the backside.
 Our Hidden Star looks almost as nice from the back.
Variations on a Hidden Star
The Goshen Star is clearly related to the Hidden Star.
Here the side points of the side SiaS are lopped off. Only two fabrics are needed.

What about a different quilt block?
For a list of all the 215+ quilt block patterns on this site, start here.
If you know the name of the block, shorten your search by using these links:
Click here if you're looking for blocks with at least some paper piecing.
Click here if you're looking for the basic building blocks of quilting, i.e., Flying Geese, half square triangles, quarter square triangles, etc., along with several techniques to make each.
And finally, use these links to find blocks in these finished sizes:
For even more blocks to make...

For you, are quilt block designs like potato chips...
...you can't have just one?!!
Check the amazing resources I rely on for all the quilt block designs you see on this website.
To see if they're worthy of a spot in YOUR quilting library, CLICK HERE.


Yummy fabrics
to drool over
Click any image below to see the full collection and find pricing and ordering information.


By Julie Baird
Copyright © 2008-2024 Generation Quilt Patterns, LLC
All Rights Reserved
Generations-quilt-patterns.com does not sell any personal information. (See Privacy Policy)