This post contains affiliate links for which I receive compensation
Cutting Triangles from Rectangles
by Caryl
(San Antonio, TX)
I, too, am a new quilter and know that this should be easy to find...I just can't.
When cutting triangles from a square, you add 7/8" to insure that you have your correct 1/4" allowance. Is there a similar formula when you intend to cut triangles from a longer rectangle (3" x 6")?
Reply
There is no standard number to add to both the length and the width of a rectangle when you are cutting for divided rectangles. That is because the legs of the triangle are two different lengths which results in different angle measurements.Where There's a Tool, There's a Way
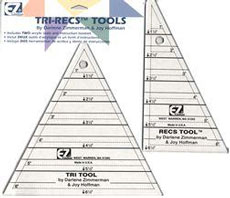
To use this ruler system, fabric strips are cut the finished width plus 1/2" for the shape you'll create. The size strips you need are conveniently marked on the rulers, themselves.
Use both the "Tri" and the "Recs" tools/rulers together, cutting one "Tri" and 2 "Recs" shapes, and you'll create a triangle within a square. Click here to learn and see how Tri Recs Rulers are used to do this.
Use just the "Recs" tool, cutting two pieces and you'll create a divided rectangle that is twice as tall as it is wide. The largest finished rectangle you can create with these rulers is 3" x 6". I've used the ruler for a "Faceted Jewels" quilt pattern by Glad Creations. The ruler was a nice addition to my quilting tools box. It did the job it was designed for.
The Recs ruler has a corner cut out of it known as the "Magic Angle" that helps you to accurately line up your shapes for sewing. A very nice feature, indeed. No guessing how the pieces line up.
Tried and True Templates
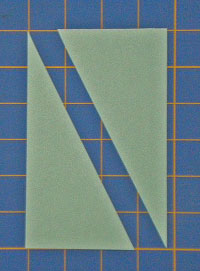
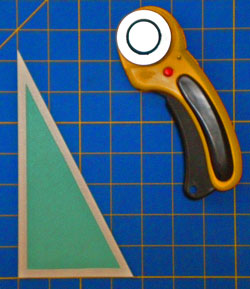
With your rotary cutter and ruler, cut a rectangle the finished size required by the pattern.
Then cut it in half on the diagonal.
Notice, I've used paper because it's handy. I prefer to cut my templates instead of drawing them. If the pencil is the least bit rounded, the templates could be off by as much as 1/8" each. That would create a big problem if there were many of these divided rectangles in each block.
Now with your ruler and rotary cutter, cut out the new template adding a 1/4" seam allowance to each side.
When I cut my shapes from the fabric, I'll place the 1/4" line of my rotary ruler on the turquoise edge of the inner triangle. Having the seam allowance represented by another color of paper makes it easier for me to see and cut accurately.
No matter which method you choose, good luck with your rectangles.
Piecefully,
Julie Baird
Editor

Comments for Cutting Triangles from Rectangles
|
||
|
||


Nifty Notions


By Julie Baird
Copyright © 2008-2024 Generation Quilt Patterns, LLC
All Rights Reserved
Generations-quilt-patterns.com does not sell any personal information. (See Privacy Policy)