- Home
- Free Quilt Block Patterns
- Colorado Beauty Quilt Block
Colorado Beauty Quilt Block Instruction
From our Free Quilt Block Patterns Library
This post contains affiliate links for which I receive compensation.
Skill Level: Beginner
The Colorado Beauty quilt block is a close relation to the Jack in the Box block—the only difference being the sashing between the units and a center square are removed.
The repeated unit is a combination of a Flying Geese and a rectangle with half square triangles. Both are simple to make using basic piecing techniques.
Neither requires any special tools or rulers. (YEAH!)
On this page, you'll learn how to make the block using connectors corners (there is a link to learn how to paper piece the unit, too!)

The beauty of connector corners (sometimes called 'sew and flip' or 'stitch 'n flip') is that you start out essentially with a fabric foundation that is cut the exact size. It is a part of the block and there as a reference the whole time. Saaaa-Weet!
Towards the bottom of the page are other blocks that use the same units. If you like making a Colorado Beauty, you just might like making those, too!
Let's get started!
General Instructions
To press, first press the patches as they were stitched, right sides together (RST). Then open the pair and press flat. For the pinnacle in perfectly pressed patchwork, check out our Best Pressing Technique.
The newest quilt fabrics to tickle your fancy...
Click the images below to see the full collection. We share any commercial and/or free patterns that showcase them, too. (For inspiration, of course!)


Step 1: Choose a technique, size and cut the patches
 Colorado Beauty design
Sample Size: 8" finished / 8&3189;" unfinished
Grid: 4x4
AKA: Colorado Block
Design Type: Pinwheel, 4-patch
The charts below are for two different techniques—blue is if you want to paper piece, mauve is if you choose Connector Corners.
In the paper piecing chart, the patches are cut over-sized to make placement a breeze.
You can print the needed patterns from the chart (see row highlighted in yellow) after choosing the finished block size.
You'll need the most current version of Adobe installed on your computer to download the pattern.
On the Adobe Print Menu page, under 'Page Size and Handling' set 'Custom Scale' to 100% before printing for accurate results. Click here to see what it looks like on the Print Menu page.
After printing, use the 1" square graphic on the printed pages to confirm they are printed accurately.
After printing, use the 1" square on the printed copy to make sure the pattern is the correct size.
For connector corners, patches are cut exactly to size.
Paper Piecing
 |
Cutting Chart for a~ Paper Piecing ~ | |||||
|---|---|---|---|---|---|---|
| Patch | Fabric | Qty | Finished Block Size | Sub Cut | ||
| 4” | 6” | 8” | ||||
| 1 | A | 4 | 1⅝" x 2¾" | 2⅛" x 3¾" | 2⅝" x 4¾" | -- |
| 2, Sky | B | 8 | 2⅜" x 2⅜" | 2⅞" x 2⅞" | 3⅜" x 3⅜" | |
| Goose | A | 1 | 3⅝" x 3⅝" | 4⅝" x 4⅝" | 5⅝" x 5⅝" | |
| PRINT Jack in the Box units... | 2" | 3" | 4"** | -- | ||
| Unfinished unit measures... | 2½" x 2½" | 3½" x 3½" | 4½" x 4½" | -- | ||
| Unfinished Colorado Beauty quilt block measures... | 4½" x 4½" | 6½" x 6½" | 8½" x 8½" | -- | ||
**Print 2 copies for a total of 4 units.
Connector Corners
 |
Cutting Chart for a~ Connector Corners ~ | ||||
|---|---|---|---|---|---|
| Patch | Fabric | Qty | Finished Block Size | ||
| 4” | 6” | 8” | |||
| 1, Goose | A | 8 | 1½" x 2½" | 2” x 3½" | 2½" x 4½" |
| 2, Sky | B | 16 | 1½" x 1½" | 2” x 2” | 2½" x 2½" |
| Unfinished unit measures... | 2½" x 2½" | 3½" x 3½" | 4½" x 4½"” | ||
| Unfinished Colorado Beauty quilt block measures... | 4½" | 6½" | 8½" | ||

Step 2: Assemble the units

Make 4
To paper piece them, click here for detailed instructions. (This links opens in a new window to make it easier for you to come back to this point in the tutorial.)
Connector Corners Technique
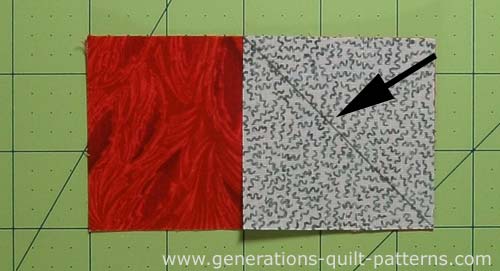
On the backside of the sixteen #2/Sky squares draw a diagonal line, dark enough to see but light enough so that it doesn't show through to the front side. I like to use a mechanical pencil because the line is reliably thin.
With RST, align a #2/Sky RST on the righthand side as show below. Make sure the pencil marking bisects the lower right corner and the top center (arrow).
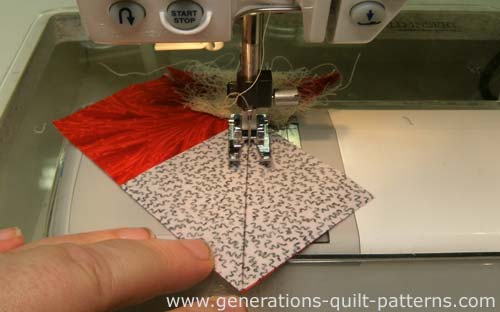
Stitch on the line. I use an anchor cloth (that's the nasty looking thing behind the presser foot with all the thread on it) so that my machine doesn't 'eat' the patches as they are fed into it.
Press flat to set the seam. Then press open so that there are three layers of fabric in the upper right hand corner. Make a total of 8 like this.
Decision Time for Trimming...or not!
At this point you need to decide about those extra fabric layers. If you're hand quilting, it goes without saying that you'll want those extra layers gone-gone-gone! It's not as important if you intend to machine quilt, BUT...
...those extra layers do add lumpy bulk to your seams.
You can either remove both of them leaving behind a 1/4" SA (top) or remove the extra layer of the #2/Sky (bottom).
If all the layers line up beautifully, then I remove both. If
my sewing leaves a bit to be desired (and it happens to all of us at one time or another), I cut away just the one layer.
Because the rectangle is cut to the exact size it allows us to
fudge just a bit like this, if needed.
The choice is yours. With the Flying Geese units, if you are going to trim, you need to do it now, before the second Sky
is added to the goose. Once it's been added it's difficult go back and trim out layers.
To finish the Geese...
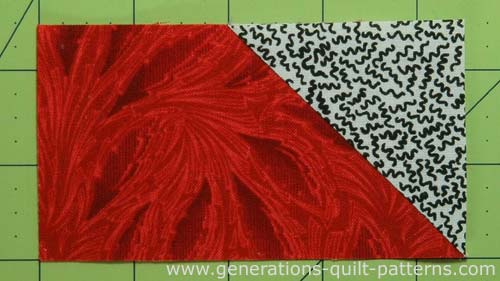
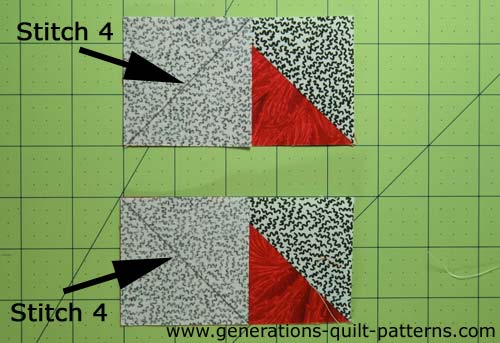
To four partially pieced units, with RST, layer a #2 on the left side, but this time with the pencil mark intersecting the lower left corner and the center of the top as in the photo below (top).
To finish the pieced rectangles...
With RST, align another #2 on the left hand side of remaining four. The diagonal marking intersects the upper left hand corner and the center of the bottom side. Use the photo above (bottom) for reference.
Press as before with the layers of the squares towards the corners.
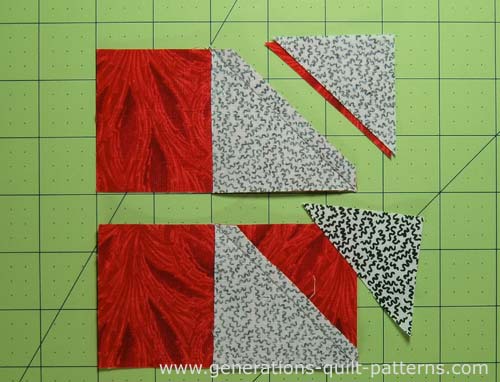
Trim the extra layer(s) of fabric away just as you did for the first eight squares.
If you removed both of the extra layers, we can 're-press' one seam on the rectangle so that our seams will nest and making matching points easier.
As you look at its back side, we've pressed both SAs to the left. Use the photo below for reference.

With RST, layer a stitched rectangle and goose unit. The SAs on the outside edge of it will nest together. I use pins to hold everything in place for stitching because it's a bit lumpy right now.
Press with the seam allowances towards the goose. (This is where out Besting Pressing Technique is really helpful.)
Repeat for the three remaining pairs.
Use the 'Unfinished unit measures...' numbers from the charts to confirm that your patchwork is the correct size.
Step 3: Assemble your Colorado Beauty quilt block
Lay the pieced patches out into rows. The goose points out of the center and is rotated a quarter turn as you move clockwise around your Colorado Beauty quilt block.

Stitch the patches into rows. Press the SA in the direction of the arrows.

Beauty may be in the eye of the beholder. But you must admit!
This Colorado Beauty quilt block is da-bomb!

Common Variations
There are a few variations on this design, though all still emphasize the center pinwheel.

Seesaw
The rectangle has lost a HST.

Land of Lincoln
The pieced rectangle is flipped end to end and the goose has lost one of it's sky patches.

Lucky Pieces
The Flying Goose is now two HSTs!

Jack in the Box
Rectangles (like a sashing) and a center are added to the original Colorado Beauty quilt block.
What about a different quilt block?
For a list of all the 215+ quilt block patterns on this site, start here.
If you know the name of the block, shorten your search by using these links:
Click here if you're looking for blocks with at least some paper piecing.
Click here if you're looking for the basic building blocks of quilting, i.e., Flying Geese, half square triangles, quarter square triangles, etc., along with several techniques to make each.
And finally, use these links to find blocks in these finished sizes:


Yummy fabrics
to drool over
Click any image below to see the full collection and find pricing and ordering information.


By Julie Baird
Copyright © 2008-2024 Generation Quilt Patterns, LLC
All Rights Reserved
Generations-quilt-patterns.com does not sell any personal information. (See Privacy Policy)