- Home
- Quilting Tools/Supplies
- Chalk Pencils
Chalk Pencils and Other Chalk Markers
Easy to Use...Easy to Remove
This post contains affiliate links for which I receive compensation.
Chalk pencils and other chalk based quilt marking tools are easy to use and readily available at your local quilt store.
In the past, using chalk ALWAYS meant you had to mark your quilt top AFTER creating the quilt sandwich. The chalk rubbed off during quilt basting.
This is no longer necessarily true.
New chalk pencils have hit the market that have more staying power.
Here you'll find our favorites along with links to add them to your own quilt-marking bag o'tricks—it's always good to have more than one option!
Clover Chalk Wheel: The Chaco-Liner
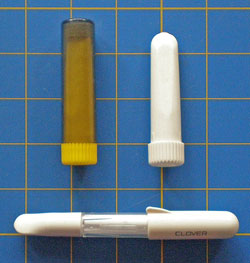 There are two different versions of Clover's Chaco-Marker
Not a pencil, per se, but this little gizmo is just a whole lot of fun to use!
But better yet!
It works as advertised!
I whole-heartedly recommend adding it to your quilt marking tools kit.
It comes in two versions/sizes (shown here). The chalk wheel on the bottom marker is smaller so you can trace a more curvy or detailed line. Because of its bit longer length you'll hold it more like a pencil.
Use it to mark your quilt top after it's basted.
This chalk formulation will (and does in my experience) rub off as you pin baste.
Simply remove the cap and lay a quilting ruler along the line you want to mark and zip a line of chalk. Then lightly blow off the excess.

That's it.
You're ready to start quilting.
Nothing to remove later.
The chalk wears off during the machine quilting process. (I do not recommend this for hand quilting...I don't believe it would last longer enough.)
NOTE: This works best for either straight or gently curving lines. Moreover, a terrific tool for marking quick registration lines or 'fences' for free motion quilting.
It comes in four colors: white, pink, blue and yellow--I own both the yellow and the white--refills are available for each color.
Some quilters have reported problems removing the blue and red chalks from white fabrics.
Personally, I stick to the yellow and white. I have not experienced any issues with removing the chalk.
As always, the BEST advice is to test before using.
Quilt Pounce Pad
 Pounce Pad with loose Miracle Chalk
Another 'not a pencil'. With this you'll be able to mark multiple lines when using a stencil.
The plastic box is filled with powdered chalk. When used with quilt stencils, either manufactured or homemade, making a mark is quick and easy.
Use either "Miracle chalk" or "Ultimate chalk" and it's durable, too.
The pad works the best when used on a hard surface.
If the chalk isn't sticking as well as you'd like, use a cheap aerosol hair spray and lightly spray the chalked design.
How to Use the Pounce Pad
- Fill this quilt marking tool with Ultimate or Miracle Chalk powder.
- To prime the Pounce and with the lid on, tap it several times on a table top to work the chalk into the pad.
- Position your stencil on your quilt.
- Tap the Pounce down on your stencil and wipe it across the openings. DO NOT POUNCE! The chalk is transferred best with a rubbing motion.
- Lift the edge of the stencil to check that all the lines transferred.
- Remove the stencil and quilt.
Chalk Removal
The Ultimate or Miracle Chalk used in the Pounce is more durable than other types of loose chalk. Remove these two longer-lasting chalks with a steam iron.
You may iron the block from the back side for removal (helpful if it's an applique block).
If you've used a metallic thread and you prefer to not iron, use a damp cloth to wipe the lines away. You may also brush them away.
One chalk marker to rule them all—Bohin's Mechanical Chalk Pencil
Not your Grandmother's chalk pencil, this one is a favorite of mine.
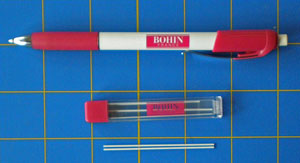
This quilt marking tool is a mechanical pencil with compressed ceramic chalk for "lead". It never needs sharpening. The extra fine pencil "lead" (0.9mm) leaves a nice line.
The chalk can be washed out or erased with the fabric eraser. And yes, the eraser on the pencils works, too!
Bohin makes refill packs in four colors—white, gray, yellow, green. These "leads" that swap in and out of the same pencil. Nifty!
Use a light box to transfer designs to your quilt top.

The chalk glides easily across your fabric and makes a brighter white line than the Clover White Marker.
Trudy has used these pencils on some of the Generations Quilt Patterns sample quilts (the largest to date is 24" square). The quilts were marked before pin basting.
She did do a bit of remarking to "brighten" the lines. They had faded a bit and weren't as dark as Trudy likes.
I(Julie) loves this one. It is neater than others (not a lot of chalk dust floating around), the point is always ready to go (needs no sharpening) and it fits comfortably in the hand.
Most importantly, these pencils leave a nice line.
Easy to see.
Easy to follow.
Precise and thin.
I like these so much, I have two. One at my sewing machine. One packed in my traveling sewing case so I don't forget it!
Dritz also makes one of these pencil—from the Fons and Porter line of products.
While I don't own that brand, I AM a huge fan of these types of pencils.
It's the 'fine-ness' of the line that makes it hands down, in my humble opinion, these the best chalk marker pencils on the market today.
Chalk Pencils that Need Sharpening
 A variety of chalk pencils
Again, with chalk, mark the stitching design after basting the sandwich. A wide variety of pencils are available. The photo shows what's currently in my stash.
Do test the colored pencils on scraps of your fabric before using them on your top.
While we've had no problems removing the chalk by brushing it away, the time you take to test can save you from a headache later.
Chalk pencils are great for last minute transfers and drawing general guidelines or "fences" in for free motion. But the points do wear down quickly.
Keep a pencil sharpener handy.
Our final re-MARK-s
Test Your Marks to Check for Remove-ability
There's nothing fancy to testing. Make a small practice sandwich from fabric scraps from your quilt. Mark with your intended chalk pencil. (It will take about the same amount of time to piece or applique your top as to quilt it.)
Evaluate!
- Did the marks last as long as needed?
- Was removal as easy as anticipated?
- Did the marks come off completely and leave no staining behind?
If the answer is "yes" to all questions, proceed with marking your top. If any answer is "no", then re-evaluate and test your marking tools.
Chalk pencils are a quilter's best friend when used at the proper time for marking your tops. Be open to trying different types to find YOUR favorite!


Nifty Notions


By Julie Baird
Copyright © 2008-2024 Generation Quilt Patterns, LLC
All Rights Reserved
Generations-quilt-patterns.com does not sell any personal information. (See Privacy Policy)