- Home
- Free Quilt Block Patterns
- Aunt Dinah Quilt Block
Aunt Dinah Quilt Block Instructions
From our Free Quilt Block Patterns Library
This post contains affiliate links for which I receive compensation.
Skill Level: Confident Beginner
The Aunt Dinah quilt block looks complex, but when you break it down into its individual parts...
...you see, it's nothing more than 3-patch quarter
square triangles and Brave World units.

Paperpiecing is the technique we'll use to keep those points pointy and intersections matching perfectly.
You'll find free pattern downloads below for 6", 9" and 12" blocks.
Let's meet Aunt Dinah!
General Instructions
To press, first do it with the unit closed to set the seam. Then open the patches and press from the front to minimize the creation of a tuck in the seam allowance (SA).
If you choose to starch your fabrics (and I do!), you'll find that you can fingerpress most of your seams.
Try my favorite pressing technique, for the flattest blocks you'll ever see. It even works for paperpiecing!
Several abbreviations are used throughout this tutorial:
- SA - seam allowance
- RST - right sides together
- QST - quarter square triangle
- BAC - background fabric
The newest quilt fabrics to tickle your fancy...
Click the images below to see the full collection. We share any commercial and/or free patterns that showcase them, too. (For inspiration, of course!)


Step 1: Cut your Aunt Dinah patches
 Aunt Dinah block design
Sample Size: 9" finished / 9½" unfinished
Grid: 6x6
Attribution: Successful Farming (possibly Old Chelsea Station)
Design Type: Even nine patch
Choose a 'finished size' for your Aunt Dinah block.
Then cut the patches and print the paper piecing patterns listed in the column below it in the chart. We'll be using both the 'Brave World' and 3-Patch Quarter Square Triangle paper piecing patterns to make this block.
Unless otherwise noted, print one copy of each pattern.
The links to download the patterns are in the cutting chart below.
You'll need the most current version of Adobe installed on your computer to download the pattern.
On the Adobe Print Menu page, under 'Page Size and Handling' set 'Custom Scale' to 100% before printing for accurate results. Click here to see what it looks like on the Print Menu page.
After printing, use the 1" square graphic on the printed pages to confirm they are printed accurately.
Look for good contrast between your two fabrics so that the points don't get lost.
Some of the cut patches look very much like one another. To keep them separated, label a sheet of copy paper with 'Brave World' and the other with 'QST' and then put the associated patches on them.
Or just print an extra copy of the pattern itself to use in the same way and keep your notes on.
 |
Cutting Chart for an~ Paper Piecing ~ | |||||
|---|---|---|---|---|---|---|
| Patch | Fabric | Qty | Finished Block Size | Sub Cut | ||
| 6” | 9” | 12” | ||||
| BW-1 | A | 4 | 1¾”x1¾” | 2¼”x2¼” | 2¾”x2¾” | no |
| BW-2 BW-3 | BAC | 4 | 2⅜”x2⅜” | 2⅞”x2⅞” | 3⅜”x3⅜” | |
| BW-4 | A | 2 | 3⅜”x3⅜” | 4⅜”x4⅜” | 5⅜”x5⅜” | |
| QST.1 | A | 1 | 3¾”x3¾” | 4¾”x4¾” | 5¾”x5¾” | |
| QST.2 | BAC | 1 | 3¾”x3¾” | 4¾”x4¾” | 5¾”x5¾” | |
| QST.3 | BAC | 2 | 3⅜”x3⅜” | 4-⅜”x4⅜” | 5⅜”x5⅜” | |
| 7 | BAC | 1 | 2½”x2½" | 3½”x3½” | 4½”x4½” | no |
| Grid Size | 2” | 3” | 4” | -- | ||
| PRINT Brave World units | 2” | 3” | 4”, print 2 | -- | ||
| PRINT 3-patch QST units | 2" | 3" | 4", print 2 | -- | ||
| Trim pieced units to... | 2½”x2½" | 3½”x3½" | 4½”x4½" | -- | ||
| Unfinished block size | 6½” sq | 9½” sq | 12½” sq | -- | ||

Step 2: Assemble the different units
Cut four units from each pattern you downloaded/printed. A rough cut will do, nothing fancy because you'll trim everything once the unit is pieced.
Brave World Units
 Make 4
Make 4
Reduce your stitch length to 15-18 stitches/inch for paper piecing. This helps make removing the paper easier.
Install an open toe applique foot (if you have one) for an unobstructed view of the stitching lines.
With a teeny dab of Elmer's Washable Glue Stick adhere the wrong side of a BW-1 patch in position on the unprinted side of the pattern. Use the dashed lines to accurately and quickly position it.
The outside edges of the fabric will extend past the dashed lines around the outside of the block on purpose.
 Use the dashed placement lines (arrows) to easily position the patch
With right sides together (RST), align a short edge of a BW-2 patch with BW-1.
Stitch on the line between them, starting before the line begins and ending after it stops and outside of the outer dashed line. This helps secure the seams. There's no need to backstitch.
 Begin and end your stitching outside the dashed lines
Press.
Add the background BW-3 triangle in the same manner and press.
 Match the edges (red arrow)
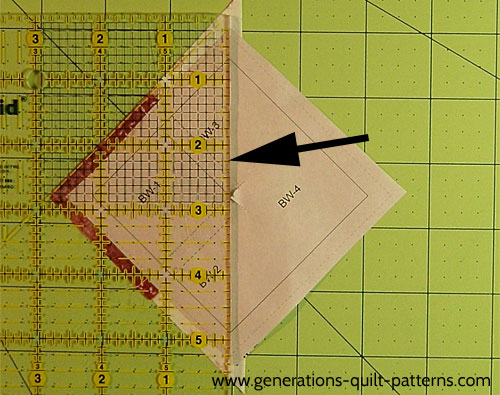
At the cutting mat, pattern side up, align the edge of your ruler with the stitching line between BW-4 and the rest of the block. Crease the paper back along this line. (You'll need to pull a few of the stitches away from the pattern—that's just fine.)
Reposition your ruler with the 1/4" mark along the fold and cut with your rotary cutter. This establishes your next placement line.
With RST align the long bias edge of BW-4 with the sewn patches. Stitch starting before and ending after the line.
 Begin and end your stitching past the outside edge of the block
Trim to size. (This is found in the chart at the intersection of the 'Finished Block Size' column and the 'Trim to Size' row in the Aunt Dinah block cutting chart above.
3-Patch Quarter Square Triangles (QST)
 Make 4
Make 4
Use a dab of Elmer's glue stick to adhere the wrong side of QST.1 to the unprinted side of the pattern.
The outside edge of the fabric is supposed to extend past the outside dashed line. The excess is trimmed later.
 Use the placement guides for fast and easy positioning
With RST, align the edges of a QST.2 with QST.1.

From the printed side, stitch on the line between them, starting and stopping about a 1/4" past the ends of the solid line.
Press.
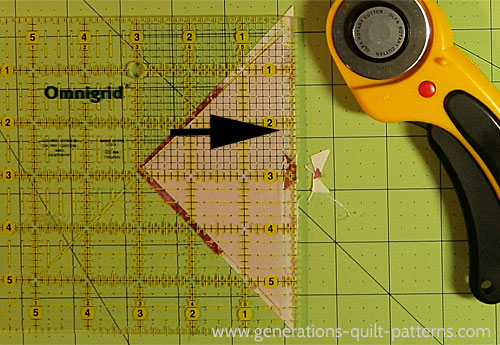
Align the long bias edge of QST3 with the sewn edges (black arrow).

Stitch this seam from the printed side, starting and stopping past the dashed outline of the block. Press.
Trim to the same size as the Brave World unit.
Press.
For more detailed directions, visit Technique #4: 3-Patch Quarter Square Triangle.
This is what the two finished blocks look like. Trim any errant thread tails. Remove the paper.
 Brave World (l), Aunt Dinah (r). Make 4 of each.
Step 3: Assemble your Aunt Dinah quilt block
Return your machine to a normal stitch length. Install your preferred quarter inch foot.
All SA for the remainder of this tutorial are 1/4".
Lay out the pieced and cut unit(s) in rows. The 3-patch quarter square triangle creates the illusion of a square-in-a-square block in the center.
Notice, too, how the diagonal seam of the quarter square triangle automatically rotates a 1/4 turn as it moves around your Aunt Dinah quilt block.

Stitch the units into rows. Press the SAs in these rows away from all the QSTs.
 The top and bottom row SAs are pressed to the corners; in the middle row they are pressed to the center.
Our finished Aunt Dinah block looks like this. Pointy, crisp and ready for a quilt!
 Our Aunt Dinah block is finished!
More related 8-pointed star quilt block patterns
There are several tutorials available to you on this website that start with an Ohio star as its base. Click on any of the images below to go straight to that tutorial.
Aunt Dinah and Twin Star may seem a little suspect.
But look closely. Those are 3-patch quarter square triangles on each side.
You'll find confirmation in Barbara Brackman's BlockBase+ (love the software). These blocks are listed in the '09 Equal Nine Patch' library in '03 Like Ohio Star'.


Someone's in the kitchen with Aunt Dinah...
...cookin' up more blocks for you to make.
Find them in our Free Quilt Block Patterns Library which lists all the free blocks, instructions and downloads available to you on this website.
Enjoy!
- Home
- Free Quilt Block Patterns
- Aunt Dinah Quilt Block


Yummy fabrics
to drool over
Click any image below to see the full collection and find pricing and ordering information.


By Julie Baird
Copyright © 2008-2024 Generation Quilt Patterns, LLC
All Rights Reserved
Generations-quilt-patterns.com does not sell any personal information. (See Privacy Policy)