This post contains affiliate links for which I receive compensation

1/4 patchwork presser foot

by Miriam
(Manchester, Connecticut)

Miriam writes...

I have a really hard time maintaining a 1/4 inch seam on my patchwork.

I'm looking at special feet for my machine that will help guide me, but there are a couple of different kinds.

What's the difference?

Which one is better?


Julie replies...

Viking 1/4 inch Piecing Foot
My first quarter inch presser foot was the standard quarter inch presser foot that is a regular quilting accessory for most machines. It's pictured to the right.

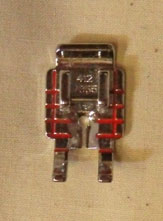
Both the left and right edges of the foot are a quarter inch from the needle.

Note the faint red markings on both the left and right edges of this foot. These mark 1/8 and 1/4 inch in front of and behind the needle.

Because of the small hole for your needle, you must use the 'center' needle position for this foot. Furthermore, you can use your straight stitch throat plate with the centered needle. (Personally, I think you get a better stitch with this particular throat plate.)

The video below shows Bernina's version of this foot (Patchwork Foot #37) in action.


Many of my friends use this type of quarter inch foot and love it.

I do not.

I never feel comfortable that I've got the foot exactly even with the cut edge of my fabric. (I'm farsignted and am known for wearing two pairs of glasses when I'm quilting—one prescription, one reading to magnify what I'm doing...there I've admitted my little secret!)

Lots of time I'm 'sneaking' downstairs to my machine to snitch a bit of sewing time...it's not the best environment for accurate stitching.

I'm also known for continuing to sew until I can't see straight, my eyes are just too tired. But I love quilting and sometimes just can't stop myself.

So I switched feet...to something that works better for how I piece...

My favorite presser foot for piecing is...

Viking Edge Stitching Foot
This foot (pictured to the right) is called an 'edge stitching foot with guide' in the Viking world.

Bernina calls their version 'Patchwork Foot with guide #57'. (The important part of the name is 'guide'.)

What I like about the foot is the guide blade or flange on the right hand side of the foot.

To stitch a perfect quarter inch seam, just guide the cut edges of your seam allowance along the metal guide.

I have to adjust my needle position because the right edge of the foot is further than 1/4 inch away from a center positioned needle. (Check the instructions for your foot to see if you need to do this.)

The following Bernina video shows this foot in action...


One of the benefits is that the foot uses the entire surface of the feed dogs to guide your fabric through the machine. (Take a look again at the first video and you'll see the feed dogs peeking out from underneath the foot.)

Another is that you can fine-tune your quarter inch seam allowance for different fabric thicknesses by adjusting the needle position. I do use a different position for when I use flannel or homespun fabrics.

Because you change needle positions, you will need to use your regular zig zag throatplate with the oval hole. This is the one that comes with most machines.

Personally, I like to starch (heavily) my quilt fabric. This foot makes accurate piecing so much easier for me...even when I'm too tired or distracted to do as good a job as I should. See my page Starch Quilt Fabric to learn more.

Watch out for pins...

To accommodate the pins used for piecing, insert your pins so the heads are on the left, or...

My sewing machine allows me to select to have it stop with the needle down in the fabric. When I do, the presser foot raises just a bit. As I reach a pin (with the head to the right) I stop the machine. The needle ends down in the fabric, the presser foot raises. I then set the foot and flange/guide down on top of the pin and keep sewing.

Yes, yes, I know I'm not supposed to sew over pins and I don't advocate it because it can mess up your machine's timing (not to mention flying broken needles). But I piece with extremely fine pins and this is what works for me.

Miriam, I hope this helps you in your search for the perfect 1/4 patchwork piecing foot for you!

Readers, what do you think? Do you have a favorite piecing foot. Do tell us about it using the 'Comment' link just below.

Thank you.

Piecefully,

Julie Baird
Editor

Comments for 1/4 patchwork presser foot

Click here to add your own comments

Question about Scant 1/4 Seam
by: Carla

I've heard sewing instructors discuss the importance of sewing a scant 1/4 inch seam allowance when piecing, to allow for the width of the thread.

However, so far, all the quilt patterns I've used don't instruct you to sew a scant 1/4 seam, but instead a 1/4 seam.

In general, should I always sew a scant 1/4 seam when piecing?

From the Editor: Next to 'what does finished vs. unfinished block size mean' this is one of the most confusing things for quilters.

You're right, the majority of printed patterns (and even the free block patterns I provide on this site) do not mention 'scant quarter inch'. It's implied.

When you get into a discussion about how to set up your sewing machine for an accurate 1/4" seam allowance is when that word 'scant' comes in most in my experience.

You see it described as a thread or two shy of the 'perfect' quarter inch. Not terribly helpful as an accurate measurement because, hey, with my old eyes, I can't count the threads in the patch as I'm stitching.

What you want is a quarter inch seam allowance, that when sewn consistently results in patches that measure exactly as intended—regardless of whether you can see the threads in the patches.

To achieve that, the best way I've found is to do a Sewing Test (as described here) with actual scraps from the quilt you are making. Then write down the way you've got your machine set up:
  1. Which presser foot if you have more than one for quarter inch

  2. Stitch length

  3. Needle position settings if you can make it adjustment

  4. Type of thread, especially if you use different threads for piecing
Why wouldn't this be the same setup every time?

If we cut two 3" squares and butt the edges together and could call that a quilt, the math would be perfect...as long as we'd cut accurately.

When we sew two 3" squares together, both squares lose 1/4" in the seam allowance. Sewn together the patch should equal 3" tall by 5½" wide (2¾" + 2¾").

BUT...

You lose a bit of fabric folding back the seam allowance (pressing either open or closed) and the thicker the thread, the more there is to fold around in the seam allowance. That's called the 'turn of the cloth'.

Since fabrics and threads are not all the same, testing for the different combinations is the best way to set up your sewing machine to stitch the 'perfect quarter inch' FOR THAT PROJECT.

Thank goodness it doesn't take long to do that sewing test, right?

Are there times when you don't need to worry about that 'scant' thing?

Of course!

When you paper piece, you stitch directly on a printed line. Needle is centered, stitch length shortened. Nothing scant about it.

If you sewing something without many patches within the outside edges of the block. Think of sewing Charm squares together, or a 9-patch or a 4-patch. There's just not as much opportunity for variation in your seam allowance as there is in a Log Cabin block (I wrote about how much an inaccurate seam allowance can affect the sewn block here).

I hope this helps in your understanding of the concept of 'scant'. I do wish there was a more succinct way to describe it.

Thanks for asking!

Piecefully,

Julie

Other methods
by: Anonymous

My mother and I just discussed this. She was using the flange foot, but had trouble going over seams. She decided to use her regular zigzag foot and her Viking has a fine needle position adjustment so that she can make it 1/4".

I have been reading up on throat plate/bed placement. My Necchi has a t-bar you can screw into the bed and adjust, and I have seen others using tape, moleskin, etc. building up an edging which is 1/4". Have you ever tried that, and what is your feedback?

Thank you.

From the Editor:

Oops! I spoke too soon in my reply below. When I was first quilting, I would use a short stack (not the whole stack)—less than 1/8" high—of post it notes to help me with my quarter inch seam allowance. I used that until I found the foot with a guide or flange on the side.

Piecefully,

Julie

Is my Mom right?
by: Faunacoco

My mother has used the flanged foot that you prefer, but we discussed this weekend that she doesn't like it as well when you have seams you need to sew over in your piecing. I have not tried that one, but have used the 1/4" piecing on for my Pfaff. I have liked it, also the one for Viking.

I now have a vintage Necchi and there is no original 1/4" foot for a machine built in the 1950s. I was thinking of getting a high shank adapter and using one of my clip on feet. However I have the seam guide you screw onto the sewing machine bed, and seen others use tape after measuring the 1/4". How does this compare? I am looking forward to experimenting with the metal seam guide, or even buying an acrylic one I have seen for Featherweights. I'd be interested in your opinion on these things.

Thank you,
Laura

From the Editor:

As long as the screw-in guide or tape method works for you, then it is the best for you. Because I've settled on the flange foot for my own needs, I haven't experimented any further.

Again, what works for you is the BEST.

Piecefully,

Julie

Markings in presser foot
by: Maria

Could you please help? I am new to sewing/quilting, I have purchased the 1/4 inch presser foot. I noticed that the foot also has some red markings, what are they for and how are they used?

Many thanks for your help, I have spent many hours on the internet trying to find this out, but I had no success.

From the Editor:
My new quarter inch presser foot


This is my new quarter inch presser foot. The red lines show where 1/8" and 1/4" away from the needle are.

I like this version of the foot better that the first one. I can guide a drawn line towards the red 1/4" line so much easier than trying to align it with the edge of the foot.

~ Julie

Brother Edge guide for Center Position Only....Help!
by: Anonymous

Very helpful for a newbie! Not only new to patchwork, but new to sewing period!
I am awaiting the arrival of my new Brother CS-6000i and after your info about the "patchwork foot w/guide" I googled looking for one. What I found was this:

SA185-Brother Snap-On 1/4" Quilting/Patchwork Foot w/Edge Guide
"Genuine Brother® Accessory. Exclusively for centered straight stitching quarter inch seams on fine fabrics. Quarter inch piecing foot with blade for seam sewing.......Single hole foot prevents fabrics from sinking into feed dogs."

Now, why oh why would this be so designed preventing needle adjustment? The feet you referred to were just the opposite....single hole on the 1/4" foot and wider hole for needle adjustments on the foot w/guide!! Is there something else I could use to get accurate seams?

Thanks!

From the Editor: The Brother foot you referenced is correct...because the distance between the needle and the outside edge of the foot is 1/4". As long as you use the center needle position and the fabric rides along the guide, you're creating a perfect 1/4" seam allowance.

The Viking foot that I use is designed as an 'edge stitching' foot. I've hijacked it to use for piecing. The Viking foot is a standard sized presser foot (it's more than 1/4" from the needle to the edge of the foot) so I need to be able to move the needle position to compensate. Because I could move the needle, I didn't need to buy Viking's new 1/4" quilting foot with a guide.

Does that make sense?

The foot you referenced is what you want for piecing with quarter inch seams.

~ Julie Baird

Click here to add your own comments

Return to GQP's Quilting Forum.


This article was printed from Generations-Quilt-Patterns.com

Print Article

Follow Us